
-

-
Subscribe
Thanks for stopping by The Colorful Bee! Stay in touch and never miss a post. Subscribe to receive an e-mail when a new post is up, HERE.Sponsor
If you're interesting in advertising on The Colorful Bee, click here to learn more.Contact
You can also email me at Linda.Leyble@gmail.com -


Categories
Subscribe
Popular posts
-
Recent Posts
Blogroll
Links

Tag Archives: decorative painting
The Custom Blue Chalk Painted and Stenciled Coffee Table
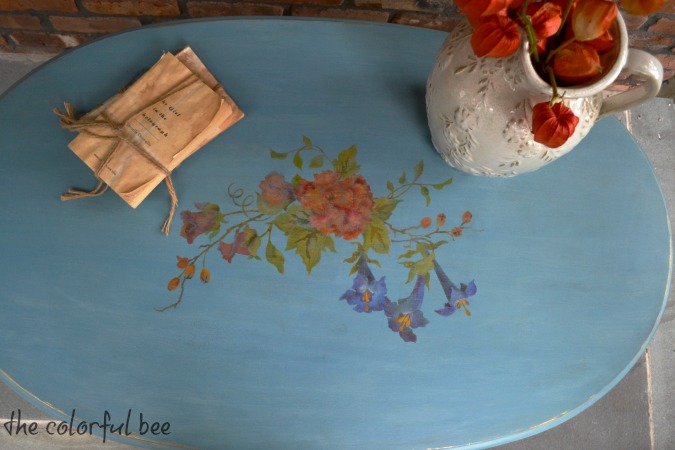
I finally finished a coffee table I had been working on for a while. I didn’t want to post it until I figured out how to tame the super shine I was getting from the wax I put on the table. I figured it out soon enough…made the necessary adjustments (not hard – a little more sanding back) and it’s a beautiful finished table. (more…)
Thanks for stopping by The Colorful Bee! Stay in touch and never miss a post.
*Subscribe to receive an e-mail when a new post is up, HERE.
*Subscribe to receive an e-mail when a new post is up, HERE.
4 Comments
Posted in Decorative Finishes, interior design, Makeovers, Paint, Tutorials
Bringing More Color into the Dining Room
Bringing More Color into the Dining Room
For today’s post I am showing you my plans for revamping my dining room space. Some will say I have enough color there – but you can never have enough color really! It just all has to blend. My dining rooms chairs really need an update, badly. So, here’s my revamp plans so far…
Thanks for stopping by The Colorful Bee! Stay in touch and never miss a post.
*Subscribe to receive an e-mail when a new post is up, HERE.
*Subscribe to receive an e-mail when a new post is up, HERE.
Easy Ways to Gild and Use Metallics on Moldings and Furniture
I may be impetuous most of the time but there’s one thing that I do that involves some level of organizing and planning – I make samples before going all out on a color or technique for a wall, molding or furniture. This is especially helpful if you are new to using a product. Investing a small amount of time in testing a color, product or technique on a sample board or a piece of molding – will save you not only money but a lot of time as well. This small sample can also be useful when you go shopping. When you’re hunting for fabrics etc, it’s easy to tote around a 3 inch molding with the color you just painted your coffee table with.

Pearl base with gold metallic paint on design, then pearl stippled over it
Using Gold and Pearl Metallics: Above is a sample I did a few years ago for a client in NYC. I had to do a different finish on his crown moldings because he neglected to tell me that the moldings had about 100 layers of paint on them! You need a smooth surface for metallic paints to look great. I wound up using a Sandstone texture on them and I made them look like limestone moldings.

This Nina Campbell wallpaper and my molding might make a beautiful powder room or small entryway design
Flash Gilding: This is a gold leafing technique where you put the adhesive size on here and there (not on the entire piece) and it’s typically done with Schiabin – which are the leftover skewings from creating gold leaf. You can use gold leaf also but you will have a lot of waste.

After the leaf is on and dry, you burnish it with a soft cloth first and then with a brush to get it into crevices and to wipe away the leaf that did not stick. I toned this particular sample with Dark Brown Faux Color from Faux Effects. This effect looks beautiful on carved moldings and furniture.

For the more dramatic, this color Nina Campbell wallpaper and a flash gilded crown molding
I had tried using metallic foils on moldings once before – at a trade show 5 or 6 years ago – so I felt it was time to do some samples with it. I had a warm red molding collecting dust in my studio – so I figured I would try some gold on that first.

For less decorative moldings, I usually just tip or highlight the edges and I make just one edge a little thicker with whatever metallic I’m using. I didn’t want it too heavy, so I sanded back a bit to distress the metallic foil. For the thin lines, I either use a very small brush to apply the size (I used Wundasize) – and sometimes I even use the tip of my finger to apply the size. When the size comes to tack, you apply the metallic foil – with the shiny side up. Then you apply pressure with a fairly stiff brush (I used a stencil brush) and transfer the foil to the molding. You can then antique it, like I did.

I toned the molding with some eggplant and dark brown glaze
You can choose to have more of the gold showing but I prefer a more aged look. I first toned it with Eggplant Faux Color from Faux Effects – but I wound up adding some Dark Brown Faux Color to mellow it a bit more.

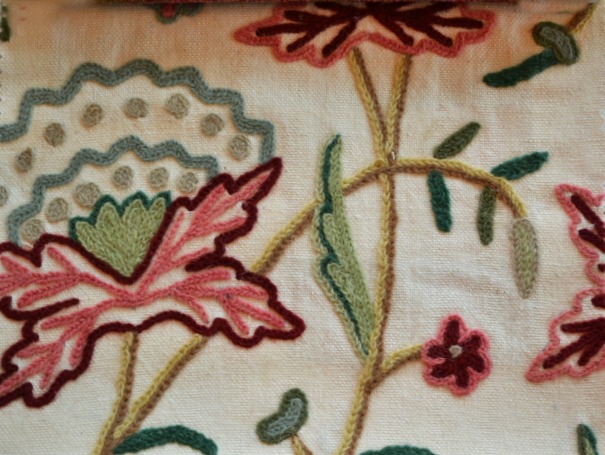
I pulled together some fabrics that could be used in a relaxed room with my molding sample – perhaps as a coffee table, entertainment unit or bookcase
And finally, I wanted to try the foil on a more ornate piece that was lighter in color – to see if I could get close to the flash gilding sample. Well, I learned something by doing this. The sample I did with the metallic foil came out hardly looking like there was any gold on it at all after I toned it! So, with lighter colors – when you are antiquing – you should put more foil on than you think.

After antiquing, you could hardly see the foil
With metallic foil, it’s very easy to go back and add more foil to a piece. And, if you add too much, you can sand it back and antique it to push it back a bit – so I find it’s very forgiving.

This foil technique came close to the flash gilding technique
If the foil is too flashy, you can wax it with dark wax, which will tone it down. I’ll probably do this.
Hope you enjoyed my metallics post. You might also enjoy my posts about using metallic foils in artwork and gilding and antiquing a Swedish clock. I love using metallics on moldings and furniture so much that I have to hold myself back sometimes so as not to do it “too much.” Let me know how you are using metallics and foils.
Sharing this with…
Thanks for stopping by The Colorful Bee! Stay in touch and never miss a post.
*Subscribe to receive an e-mail when a new post is up, HERE.
*Subscribe to receive an e-mail when a new post is up, HERE.
5 Comments
Posted in interior design, Tutorials
A Faux Cobblestone Dog House
Every once in a while, I get to do something tremendously enjoyable. I was working in a beautiful and very expensive kitchen which was being revamped. There was a closet in the space that the client didn’t know what to do with. She wanted a bulletin board space for her children – a place where her 4 kids could post their school and extra curricular activities etc. I suggested that we divide the closet in half and have the upper half for the kids…and the lower half…for their beloved dog (who was a rather large dog with the temperment of an angel!). This is what I came up with!

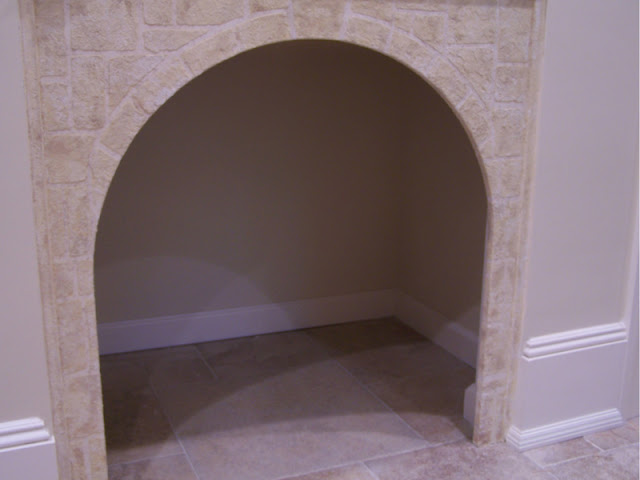


I had my contractor fashion out a dog house facade shape from sheetrock which I then primed and painted. I wanted to keep the same look as the floor, so I first rolled on a texture (Sandstone from Faux Effects) to mimic the grout. I let it dry (not…I used a hair dryer and made it dry faster!) then I taped the pattern of the cobblestones with 1/8″ tape. I burnished it to make sure it stayed put. Then I troweled on a few tinted layers (some whiter, some with a bit of ochre and some raw umber) of a texture called Quartzstone from Faux Effects. For getting in to some of the smaller areas, I made my own little plastic trowel from a styrene board. After it dried (the next day), I toned it (with some of the same tints I used in the texture) here and there to match the floor even better.
I loved doing this project because it really helped keep the look and feel of the kitchen – but it served a practical purpose. Decorative techniques can really help solve problems.
If you are having any difficulty figuring out any problems with your rooms, just give me a call. I am sure that I can come up with something unique and beautiful!
I am linking this project to…
Miss Mustardseed Between Naps on the Porch Hope Studios’ Tutorial Tuesday Home Stories A to Z My Uncommon Slice of Suburbia Redoux
Thanks for stopping by The Colorful Bee! Stay in touch and never miss a post.
*Subscribe to receive an e-mail when a new post is up, HERE.
*Subscribe to receive an e-mail when a new post is up, HERE.
9 Comments
Posted in Tutorials
 Decorative Finishes
 Interior Design
 Home
Home Garden
 Holiday
 Makeovers
 My Life
 Business
 Tutorials
 Videos
 Paint
Paint