One of my long time clients, Staci, had a commercial range hood installed in her kitchen. She loves to cook (she’s Italian and a great chef!) but she never loved how her residential range hood performed in terms of eliminating cooking odors. She’s still be smelling the dinner she cooked for her family that night when she went to bed upstairs. So, in other words, it wasn’t working!! Her kitchen is quite large and her cooktop is on the kitchen island and so an exhaust duct (not sure what you call that) would have a long way to travel in order to work properly.
She was loving how the commercial range hood was eliminating cooking odors – but boy it was ugly!! So she called me to see if I could help her. Feast your eyes on this monster!
Lovely…right?
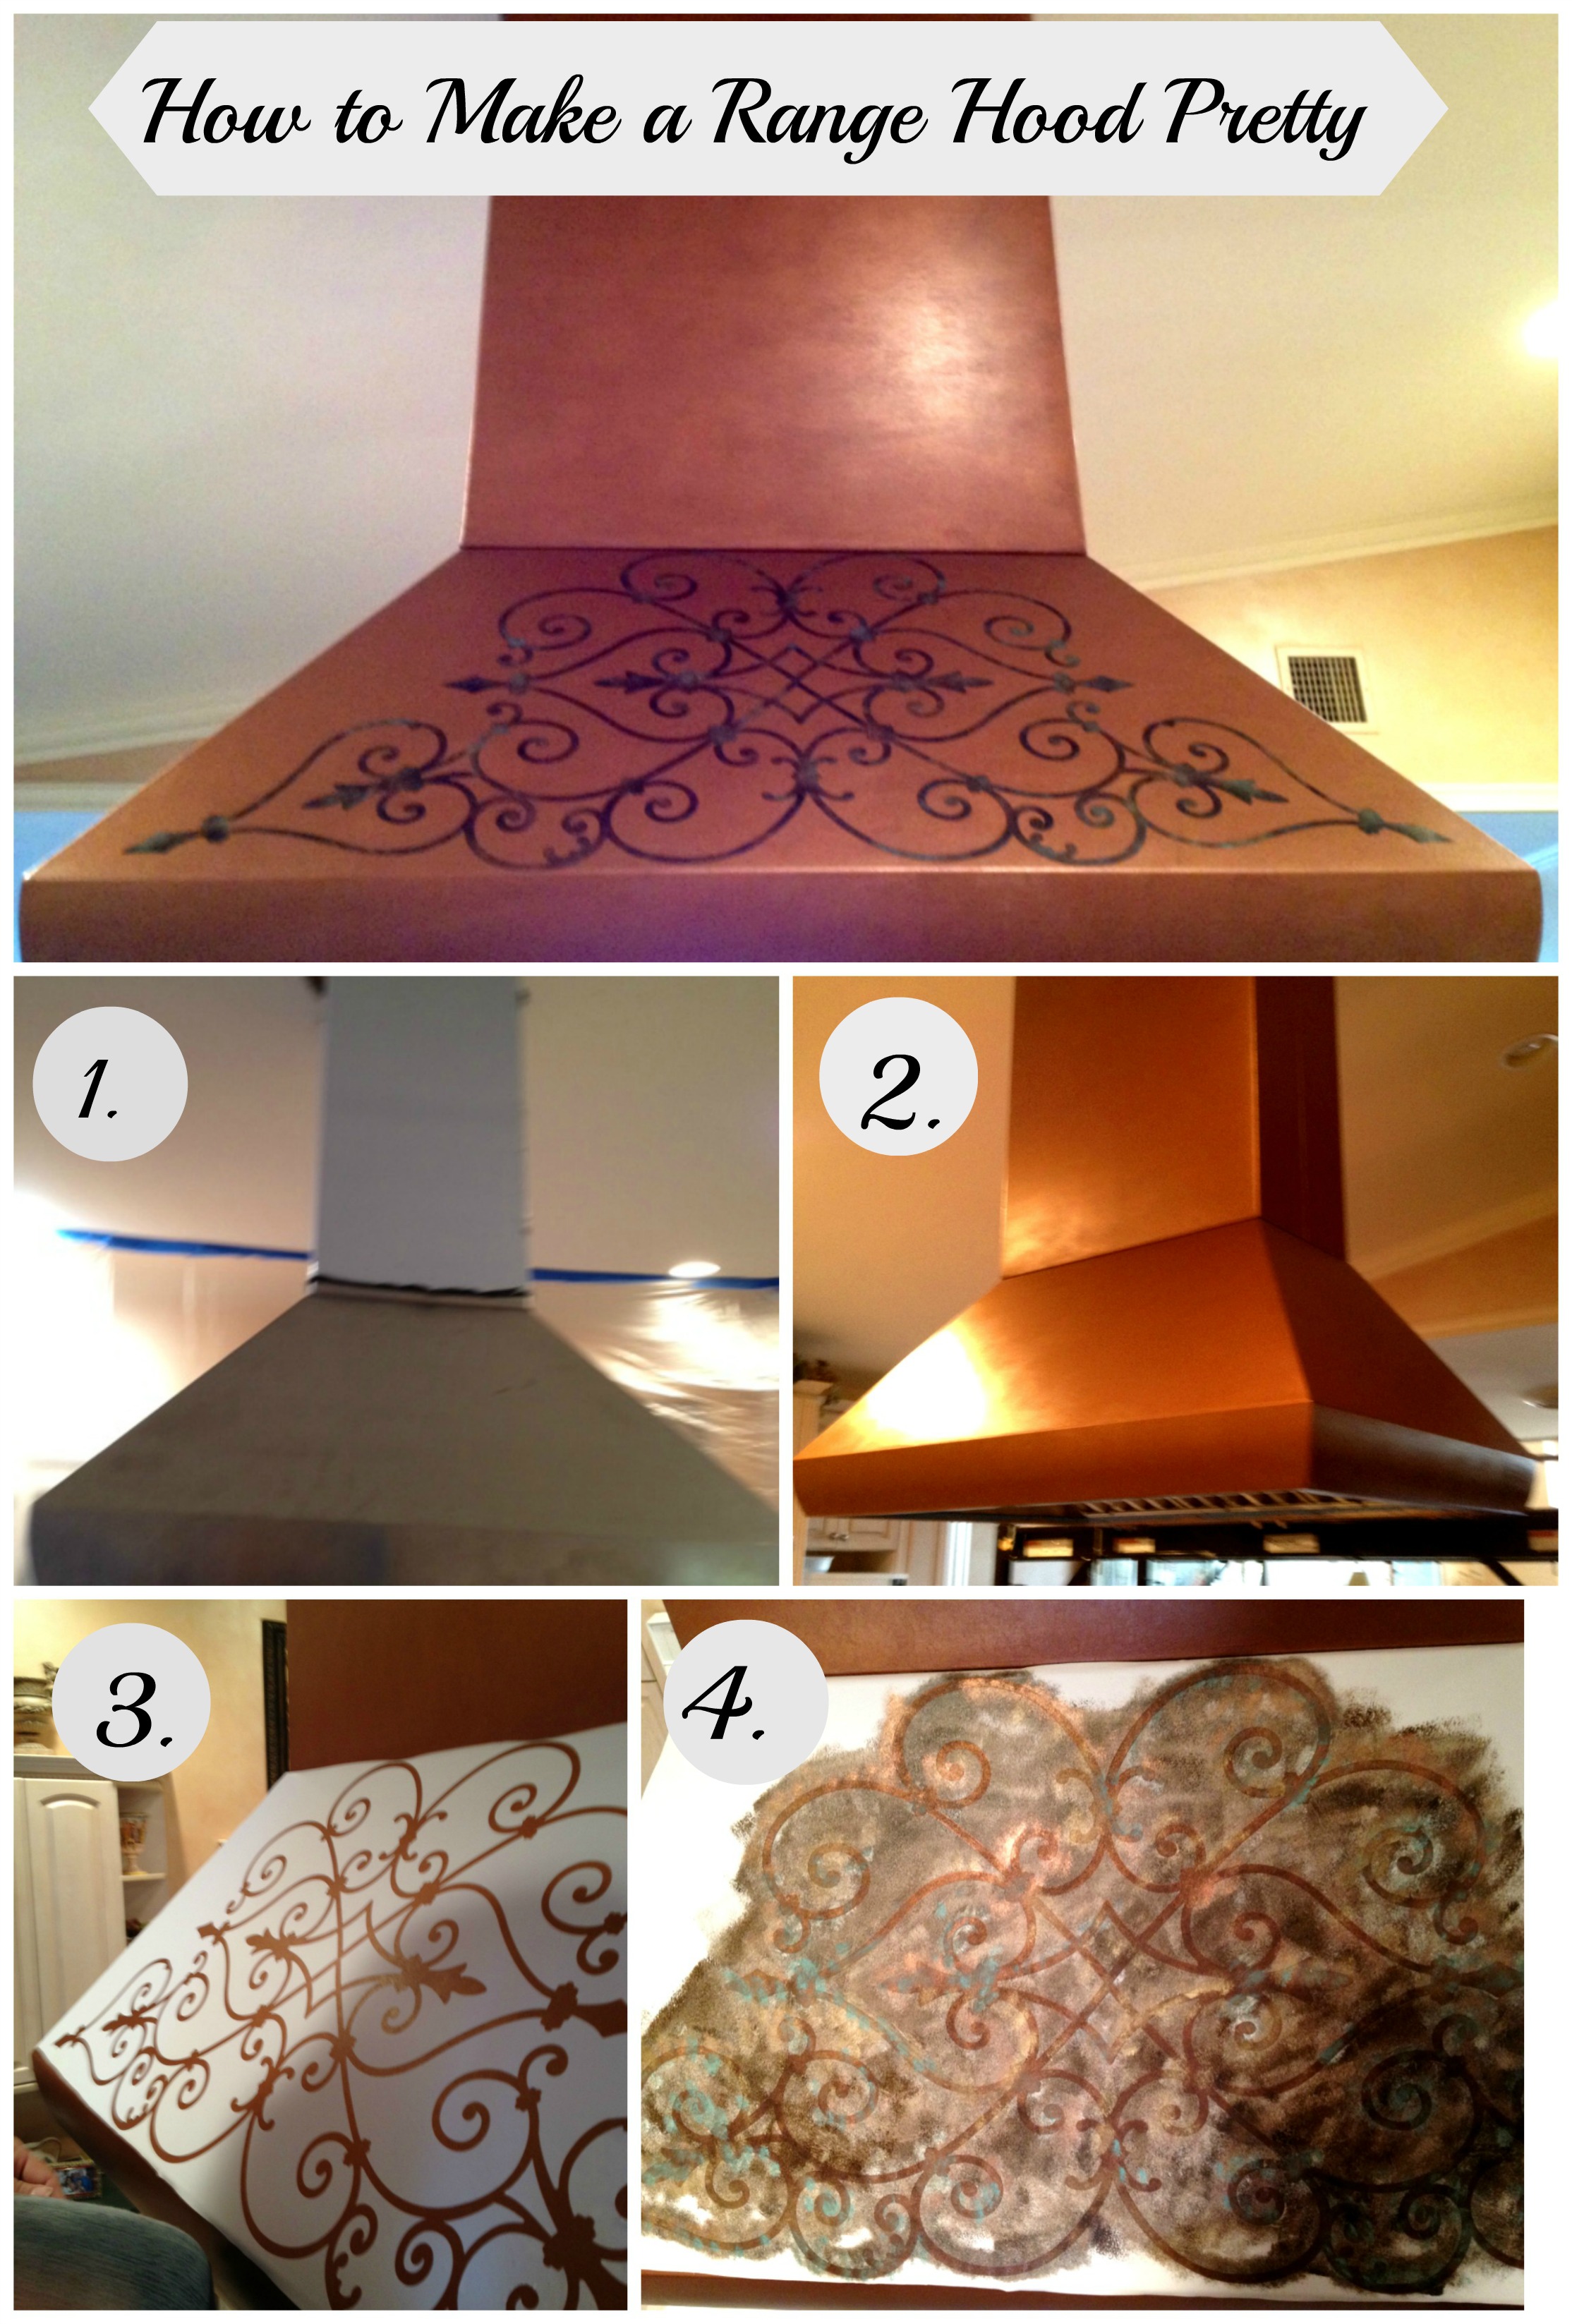
So, I had my work cut out for me. First of all, it’s pretty difficult to paint on a shiny, stainless steel surface because it’s hard to get any paint to stick. You can’t just use a primer, then paint it and voila! No – you need to degrease the surface (I cleaned it with Krud Kutter, a non toxic cleaner) and then you need to use something to etch into the surface so that it will give you some tooth (painter-speak for “it’s OK to paint’). I used a product by Faux Effects called PrimeEtch. I had used this only one time before when a client had asked me to paint and antique her bathroom vanity which was finished with a very shiny factory finish. I have to thank Cat Faust at Faux Effects in Florida for telling me how best to apply the primer (thinly, with a sponge brush). I then let it dry overnight to work its magic. When I had first used the product, I was in a hurry so I only let the primer cure for a few hours – but luckily everything worked just beautifully. This stuff is like liquid flypaper (that’s what I call it) because it really gives you a great surface that paint can stick to.
As always, I did some samples for my client. I had done a lot of work in her home before and I knew her favorite colors and what she liked.
Sample Board for color and ideas for design
I also did a sample on the stainless that her installer gave her – to see how the PrimeEtch would work. It worked on the sample – so the project was a “go.”
I blended a 50/50 mix of bronze and copper metallic paint for the basecoat. Copper alone would have been too bright…and bronze alone would have been too dark – so this was the perfect solution.
Range Hood with the basecoat, without antiquing or design
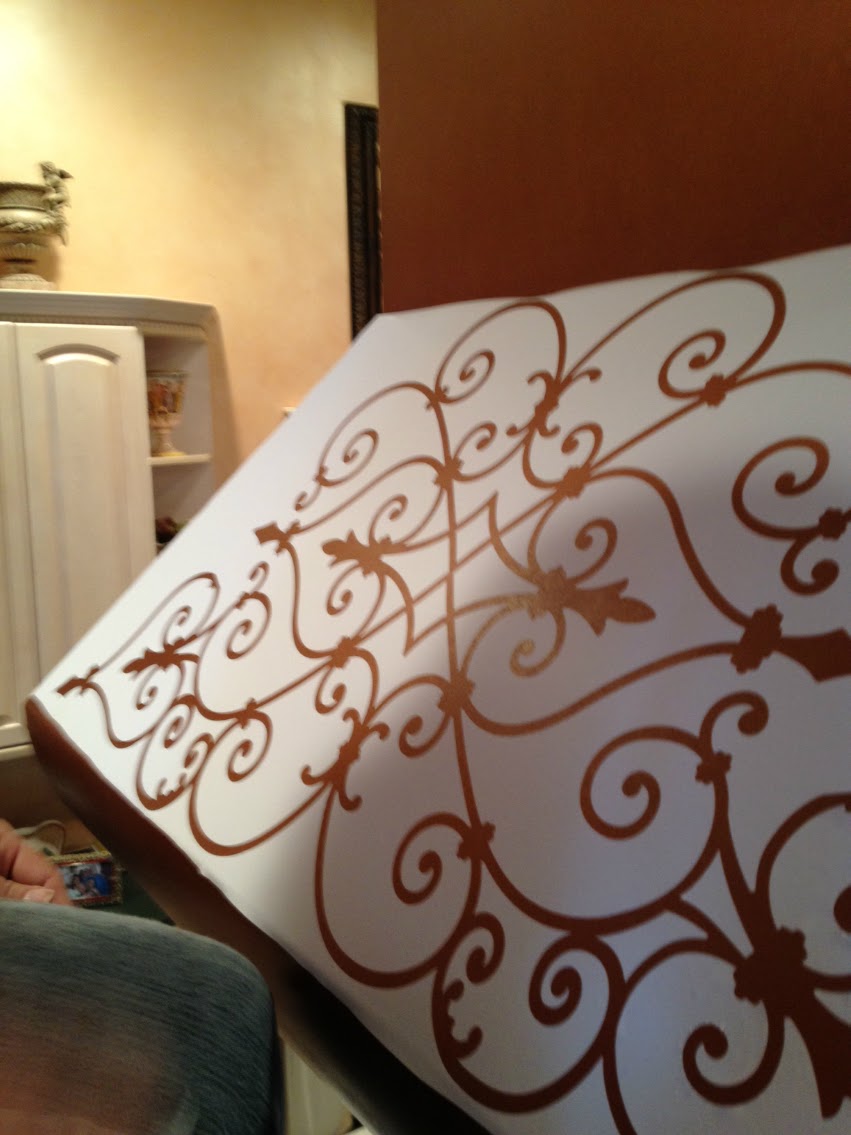
I suggested a few decorative motifs from Modello Designs – which I’ve talked about before (see the post about how I used an intricate one on my ceiling Here. This company makes one time use stencils that are truly gorgeous and intricate. Staci chose a lovely wrought iron gate looking design, which would go with the look in her kitchen. She has a lovely piece of wrought iron artwork over one of the doors in her kitchen, so the design would pick up on that. The placement of the design on the hood is perhaps one of the trickiest parts of the process. You have to measure and measure again to make sure the stencil is level and not lopsided. The adhesive on the underside of the Modello is pretty darn tacky…so if you make a mistake – it’s not all that forgiving. So – measure twice…place once!
That’s me and my knee up on the scaffold
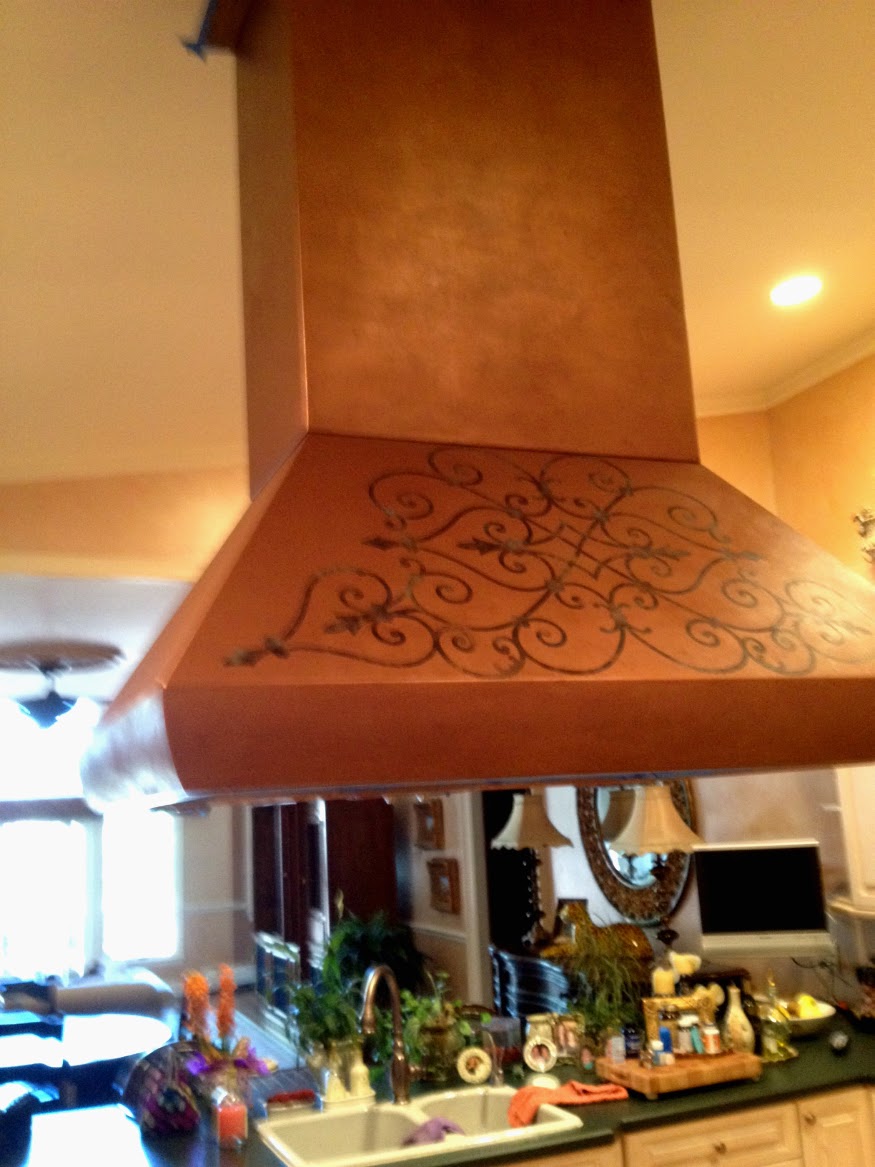
The design done with dark brown, copper, gold, verdigris and black
Looks lovely, huh? You always need to do a sample with this method because it’s very hard to see what you are doing. Unlike a stencil, which you can lift up to see how light or dark your design is, you can’t lift this up until you are done. But the designs are so beautiful, it’s worth the extra effort to make a sample so you don’t overdo or underdo (is that a word?) a color. I wanted to effect an antique wrought iron look, so I started with an overall dark brown – and then I floated in some copper and some pale gold – and then some verdigris color. To finish it off I added some black to help pop the design and give it more depth. Then I gave the entire range hood an antiquing glaze of brown and dark brown…just enough to age it gently and to cut down on some of the shininess of the metallic base.
I hope you enjoyed this little tutorial. So, if you have a range hood like this – don’t despair. It can be made beautiful! Let me know what you think of this transformation!
Thanks for looking! Please leave me a comment or a question.
I will be linking this project up to…


 Decorative Finishes
 Interior Design
 Home
Home Garden
 Holiday
 Makeovers
 My Life
 Business
 Tutorials
 Videos
 Paint
Paint
This is absolutely beautiful. You did a fantastic job and your tutorial is very detailed. I look forward to more pictures. I have great admiration for those that do things I would be totally afraid to try. Great job.
Thanks for your great comment – I am blushing!
This is fabulous Linda! I am totally impressed with your talent and thoroughness to see that the job ended up with one result: perfection!
Thanks Amy for your wonderful comments!
Linda,
You have that touch to make something so so look amazing! great job!
dee dee
Thanks Dee – I appreciate it. I try hard to make things beautiful
Linda what an amazing transformation!
Great Work!
Very pretty! The stencil really does transform the whole look of the hood>
What a great personal touch to an already gorge kitchen. 😀 Thanks for stopping by BeColorful today and leaving such a glowing comment. I was late in getting up today's Motivated Monday but it is now up and running.
:p
Great job, first of all, and a well written article. Fun to read and a lot of info to share. Double thanks!
This looks fabulous! Thanks for sharing!
Wow – that's awesome! My parents have a hideous range hood over their island cooktop. Maybe I could do something like this for them as a gift! Thanks for the inspiration. 🙂
That is really gorgeous. What a beauty.
Wow, what a transformation! The finished hood looks amazing 🙂
Charlie @ Match Made On Hudson
This looks awesome! Your blog shows your talent very well!
Thanks so much for stopping by and your comment!
I'm a new follower.
makingitfeellikehome.blogspot.com
Linda…this is a fabulous transformation! (I am a fan of krud kutter as well)I wish I had a hood like this to play with…but wowzer…this is awesome! A lot of work but well worth it…great job!Thanks for stopping by 21 Rosemary Lane and leaving your sweet comment! Hope you have a super weekend!
Linda, what an inspiring blog and what a fabulous idea so much better. Thanks for your lovely message too. Enjoying the green of the garden too, Amy [BYW2.)
Wow – GREAT job, Linda! You are one talented gal! That was one monster job to take one, but you made it look so easy. 🙂 Thanks for visiting Heaven's Walk and becoming a new follower, too!
xoxo laurie
WOW Thanks for all of the tips of how to DIY a project like this. I've always wondered how to paint on metal and get it to stick! Will definitely be book marking this post and am looking forward to exploring your blog further.
PS thanks for visiting The Flirty Blog and leaving your comment 🙂
You are more than welcome for the feature. It really is stunning and I was proud to share it. Have a great week.
p
Linda, this is fantastic!! I've never been a fan of the industrial hoods, but you made this one into a masterpiece!
Oh, and thanks so much for your lovely comment on my new blog, and I do know some pretty talented nurses. Maybe you're onto something there… 🙂
You're right, I'm gonna enjoy it here! New follower!!
Wow! What an awesome idea and transformation! Thanks for stopping by my blog and checking out my tables! I'll be following you too, you are very talented!
Thanks! I love to transform things! I so appreciate your commenting!
Linda
Linda,
You’ve certainly done a great job on the hood-very nice.
So glad you linked up with us at the BeBetsy BRAG ABOUT IT Link and Hop.
We’d love it if you would link back to BeBetsy. Thanks! http://bebetsy.com
Have a great week~xo
Sharon and Denise!
BeBetsy recently posted..Breezy Summer Party Dresses
Love the treatment of the hood. Beautiful. Is it washable?
Yes it is washable. You just have to dust it a bit first – and use a very damp cloth!
This is gorgeous!!! I want to do this on a much smaller scale, I would love to know what paints & glaze you used?! Thank you for the inspiration!!!