
-

-
Subscribe
Thanks for stopping by The Colorful Bee! Stay in touch and never miss a post. Subscribe to receive an e-mail when a new post is up, HERE.Sponsor
If you're interesting in advertising on The Colorful Bee, click here to learn more.Contact
You can also email me at Linda.Leyble@gmail.com -


Categories
Subscribe
Popular posts
-
Recent Posts
Blogroll
Links

Author Archives: Linda
What to Do With Kitchen Soffits
I’ve posted about this before on this blog and on my home staging blog – but since this project has been featured on some other blogs and the topic is very popular, I thought it would be a great idea to post it once more with some additional information on how I created the look.

Add crown molding to your soffit area to create height
Soffits (or bulkheads) above kitchen cabinetry make a home feel dated. And if you paint the soffit a contrasting color, it only makes your cabinetry seem smaller and it makes the height of the kitchen less tall.
1) If your cabinets are in good shape, you should add crown molding to the ceiling above the cabinets and add some trim molding to the bottom of the soffit.
")
Create a color that is close to the base color of your cabinets and add graining layers
2) Since these cabinets were in great shape, we decided to go with an oak woodgraining for the soffits and moldings. The “trick” to getting the oak woodgrain (or any faux wood) right is to try to match the underlying color of the cabinets. Oak has a glow to it so I first used
-
a medium tone yellow base paint (1 part Woody Yellow and 1 part Neutral White basecoat from Faux Effects).
-
Then I did a pale gold metallic paint over that (a pale wheat color from Faux Effects Metal Glow line). You could also just do a gold glaze over the basecoat – just enough to give it a glow.
 I made up a glaze for the woodgraining layer. I used Chestnut Brown and Earth Brown Glaze and went over (in sections) the soffit and moldings. I created the woodgrain by removing the glaze with a wipe out tool. I used torn pieces of corrugated cardboard. Then when it was dry, I took a paintbrush and darkened the grain to match what I was seeing in the cabinetry. I also used a graining comb for the smaller areas and around the wood grained areas (you can buy this at Home Dept I believe – or at Michael’s).
-
Then I overgrained the entire surface with the same graining material as the first layer. I had to adjust the color here and there because the color of the oak cabinets differed in various sections. Some I had to make a bit darker…some cooler. Then after everything was dry – I did a faux marquetry design on the soffit…the fun part of the job!
3) You could use any border stencil for this last decoration. This part is, of course, optional!
-
I used the Renaissance Scroll from Jeff Raum stencils. I used some Mahogany, Ebony and Cherry Stain and Seal from Faux Effects for this technique. However, you could also look at Royal Design Studio’s line of stencils. The owner, Melanie, has many that I love – the Showcase Scroll is one of my favorites. If you’d like to try a carved wood look, try the Palermo Scroll or Endless Acanthus Scroll.
It takes time and a lot of practice to do woodgraining, but it’s worth it to take the time to learn. It has come in so handy so many times for me. If you don’t have the time (or patience) and you’d like to re-do your cabinets that have soffits – you can paint them a white or off white and antique them and it will give you that updated look. As long as you add the crown molding, your cabinetry will seem taller.
Hope you enjoyed this!
Sharing with…
Thanks for stopping by The Colorful Bee! Stay in touch and never miss a post.
*Subscribe to receive an e-mail when a new post is up, HERE.
*Subscribe to receive an e-mail when a new post is up, HERE.
12 Comments
Posted in Uncategorized
Would You Love to Have a Jolt of Daily Inspiration? Read Abigail Ahern’s Blog
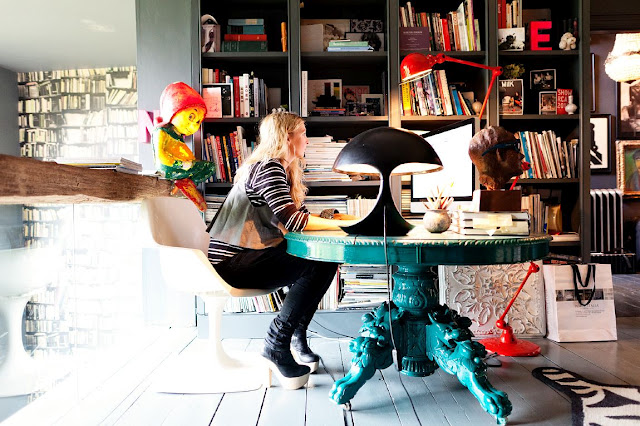
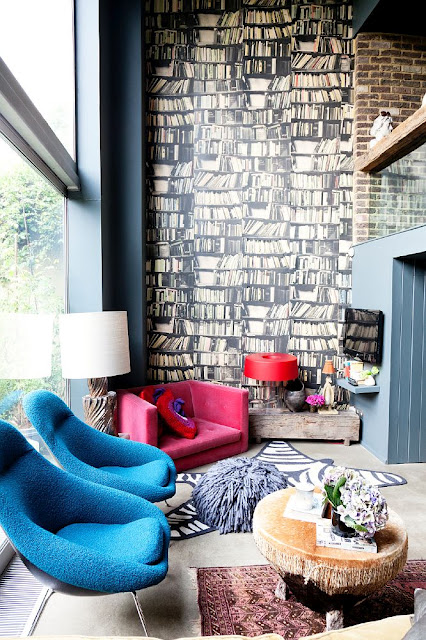
I can’t remember how I came across this quirky, creative and wonderful UK designer, Abigail Ahern, but sometime last year I stumbled upon her blog, which I follow and read daily. Not only does she give you great ideas to try in your home…but the way she writes about design is so refreshing and funny while passionate and informative.


Maybe it’s the Brit humor that I love (I must love it because I’m willing to read it at 2AM if I am having a sleepness night – that’s the time her blog reaches me here in the US)…but more than that…it’s her style that is very captivating and fearless. I sincerely recommend that you check out her wonderfully witty and creative blog. With blog post titles like “Tips for Laid Back Lairs,” “Pushing Boundaries,” “Decorating Changes Lives” and, my fave – “Yabbering” you know you are in for a different kind of design discussion.

Her lively and vulnerable writing style will ease you into taking risks with your own decorating attempts. Willingly, she tells you of her failures (with paint colors and other design techniques) as well as her successes (her new BBC TV show “Get Your House in Order”…and her brilliant set design on the BBC cooking show with Heston Blumenthal).

She holds a Master Class Design School at her house (there are several coming up this year – check her blog for dates) and she may be doing one in New York City this year as well. I hope so – ’cause I would love to meet her and be inspired by her energy, enthusiam and creativity.


On her blog you also get to meet her two kids – her dogs, Mungo and Maud…who have their own Facebook page mind you!


So, if you are looking for some wonderful design inspiration (besides here, of course!!) on how to make your home really unique, I suggest that you read Abigail’s blog. If you’re in London, she has a shop in Islington. Next chance I get to be there, that will be my first stop.
If you would love to take some design risks in your own home…but you need a guiding hand, please call me at 631 793-1315. Have a happy day!
Thanks for stopping by The Colorful Bee! Stay in touch and never miss a post.
*Subscribe to receive an e-mail when a new post is up, HERE.
*Subscribe to receive an e-mail when a new post is up, HERE.
1 Comment
Posted in Uncategorized
Some Pinterest Favorites: Patchwork Chairs, Sofas and More
I can get lost adding images to my Pinterest boards. I guess part of the reason is that I love to get the emails from Ben and the Pinterest gang telling me how many people repinned the images that I have chosen. It’s like a validation of great taste – or that’s what I tell myself anyway!


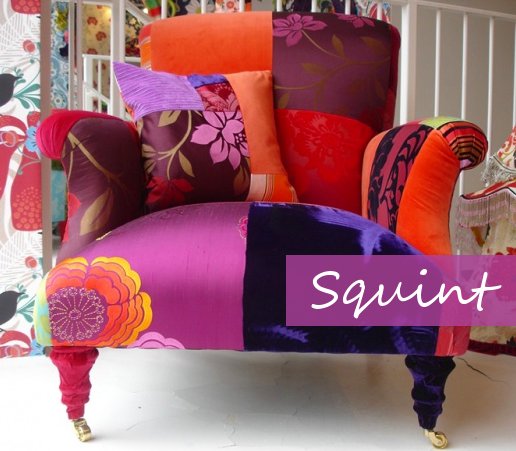
This week I found a company called Squint Limited that’s based in London. They’ve been around for quite a while and I know that they have been featured on many blogs in past years – but due to the interest on Pinterest, I thought that it warranted another look.

A Victorian Chaise via Squint
I love the delicate fabric combinations and the textured looking silver-gray finish on the legs. I also love how the rest of the frame is upholstered – instead of showing the wood. It really gives it a different look – not your usual!
Beautiful wing chair and pillows from Squint via JuBella

Look at the beautiful detail on the back of this wing chair from Squint via Design Milk
They will upholster just about anything…chandelier shades and styrofoam wreaths. Image via

They’ll cover the entire lamp…not just the shade.

And they choose some incredible colors! Image via Squint

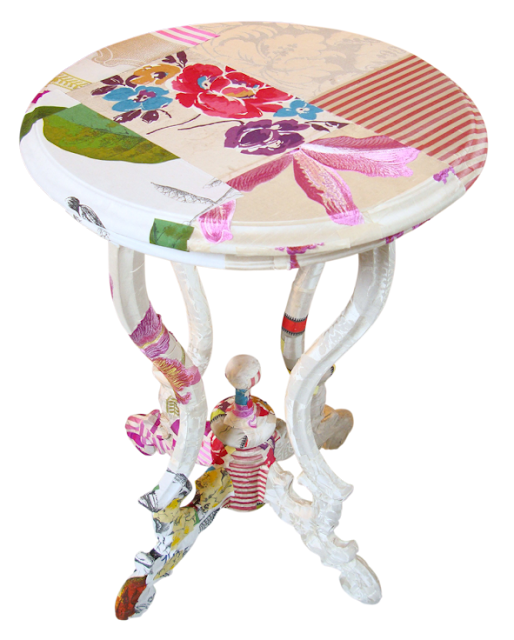
This table gives me a lot of ideas, like handpainting, striping and stenciling something similar.
Image via Squint

Look at this dark green upholstered beauty

I love this. I can see it being done with stencils and handpainted motifs.
Upholstered chest from Squint via Design Milk

And how beautiful is this peacock mirror?

Anything is fair game for re-upholstering for Squint! Image via
The company was started by a former painter and sculptor, Lisa Whatnough. She had a penchant for collecting antique textiles – and this was a wonderful way to put them to great use. The prices at Squint – will make you squint but you can see how much time, creativity, passion and energy went into every one of these pieces.
Perhaps you will use these images, as I will, as inspiration for projects that you can make during the year. My mind was going wild with thoughts of how I can use my own collection of fabrics for upholstered chairs that I have (that need some new clothes!)…and also some lighting and furniture pieces that I can re-do.
Hope this inspires you as well. Let me know what you think of these fabulous pieces!
Linda
Thanks for stopping by The Colorful Bee! Stay in touch and never miss a post.
*Subscribe to receive an e-mail when a new post is up, HERE.
*Subscribe to receive an e-mail when a new post is up, HERE.
3 Comments
Posted in Uncategorized
Worst Trends of 2011
I may be a little late on this discussion…but I thought it would be worth a quick blogpost. In January, Elle Decor magazine asked 5 designers to talk about the 5 worst trends of 2011 that have overstayed their welcome. You can read the article here.


One designer, Sheila Bridges, said that DIY was one of them. Just because a piece of furniture could be reclaimed doesn’t mean it has to be. I think that if something is about to fall apart, or if it’s an ugly piece to begin with – without any shape or style – then I think that it should be left at the garage sale, thrift shop or curbside. But, with all of the people who are writing DIY blogs and their countless readers – I think that DIY has never been stronger, more creative – and wonderful. Sheila may be the designer to the stars – and, most notably, Bill Clinton, but I think she may be a bit mistaken in her assessment of a trend that has really taken hold and I don’t think it’s going to go away quietly.
DIY has probably grown in recent years due to the recession. People cannot afford very pricey furniture and they looking for budget-friendly ways to decorate their homes. I have always been a fan of re-doing furniture and will probably keep doing it even after the economy rebounds. It’s a beautiful craft and, if I must say so modestly, it’s something I do well. It also saves a ton of money for all of my clients and in this day of ever-increasing squeezes on our pocketbooks – I am glad that I can give them a beautiful home without them spending a fortune.
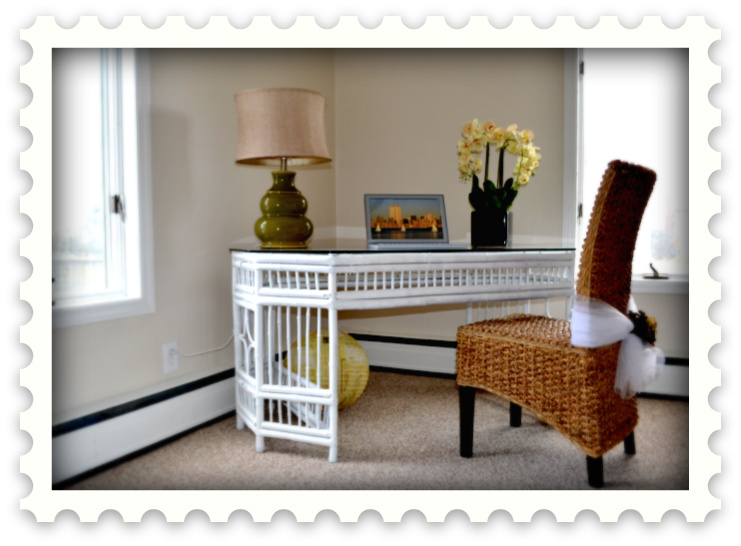
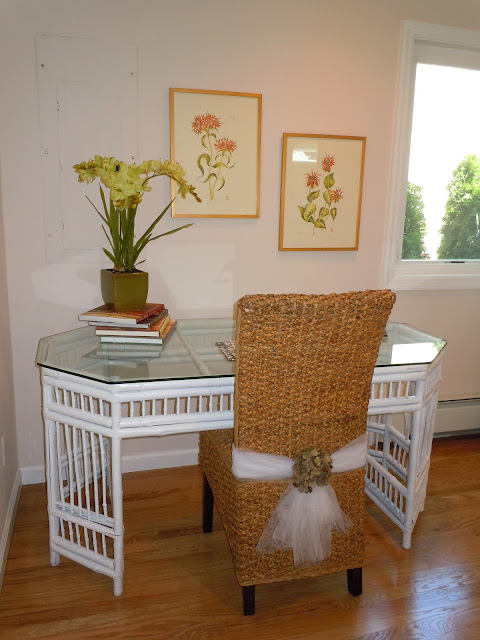
A $20 bamboo vanity/desk that I found in a Port Jefferson NY thrift shop!

Here it is in another staged home I did
Some of the bamboo wrungs were missing but my husband found a few “look-a-likes” around our house (stem supports from faux orchid pots) and replaced them. When I found the piece it was sitting right outside the basement of the shop in a natural but very grayish state. I cleaned it up and I spray painted it with gloss white – and voila – a lovely little accent piece. I use this a lot when I’m staging because it’s very light and transportable and I think it looks beautiful. In the future, I’d like to do an etched design on the glass – I think that that will really be lovely.

A $25 Craigslist find revamped with Annie Sloan Chalk paint and Royal Design Studio stencils

Our JC Penney entertainment unit – revamped. You can read about how I did this here
A garage sale find – quickly revamped with Annie Sloan Chalk paint and stencils
These are just a few things that I have done that I have some photos of. I have to begin photographing the many things I’ve done over the years.
Using Books in Interior Design is on the List of the Worst Trends (but not on my List!)
The other design trend that’s supposedly due to die out is the use of books in interior design. I agree that it should not be done willy nilly but if you have lovely books just collecting dust in a bookcase – I think they should be stacked on a coffee table or placed on a console behind a sofa…or even stacked next to a chair in a reading area. I do this all the time in my own house and guess what? People pick the books up and start reading them! Just yesterday two of my friends picked up design Mary MacDonald’s recent book and said they would probably buy it! If it was just sitting in my bookcase – it wouldn’t have had any attention! If you’d like to read my blog post on using books in interior design, go here.
Would love to hear and read your comments on this! Thanks
Thanks for stopping by The Colorful Bee! Stay in touch and never miss a post.
*Subscribe to receive an e-mail when a new post is up, HERE.
*Subscribe to receive an e-mail when a new post is up, HERE.
4 Comments
Posted in Uncategorized
A New Way of Looking at My Blog
Hi everyone. I am sorry that I have been a bit tardy in writing. I was busy with some last minute client projects – some window treatments to install…a faux finishing project and a home staging project. Then – over the weekend, I took a wonderful Blogging Class (Road Trip, Blogging Your Way NYC) with the delightful Holly Becker, the wunder-blogger (did I just coin a new word?) behind the successful decor8 and Leslie Shewring of A Creative Mint. There was so much to learn but I know that I came away with a lot of very important ideas. I also learned how to operate my Nikon 3100D Digital SLR camera much better – and I learned some new tricks on PhotoShop Elements. Here are some of the pictures I took at the workshop.


One of the other delightful things about taking the class was finally meeting one of the first people who ever commented on my blog – Shawn Byles of the blog Jamaica Byles. Shawn is an awesome textile designer and I encourage you to check out her blog. She will be revamping her blog as well though, after attending this wonderful workshop.
The Big Aha Moment: I think that the one critical thing that I learned was that I needed to share my creative process on my blog. What inspires me to create such and such a faux finish or to concoct a particular color scheme in a room. My inspirations come from many, varied places – it could be a photo of an old house in Provence, the colors in a painting, an advertisement in a magazine. Inspiration is everywhere. But, as a creative person – I usually just show the final product.
So, not many people really understand the process that brought that particular look together. I now know that I need to “tell the story” behind a room, a color scheme…a finish. I know that I have done that at times (especially when I am giving some of steps in the recipe) but I am not “showing” the whole story. Not only the reason behind the look, but the process: Show the tools, the bottles of tints that comprise the color, the bucket of plaster and me applying it. Or when it comes to using fabrics in a room – perhaps I should show the fabric showroom and how I come to choose several fabrics amid a sea of possibilities.
To compose those shots, it takes another skill that I am only beginning to develop – styling. It’s one thing to pull some colors, finishes and accessories together in a room…but to pull it together for a photo shoot is another thing. I have to exercise this muscle and better my eye for this. I know that I will be taking a ton of photographs until I am happy with the result. For the above photos I must have taken hundreds of less of than beautiful shots before I loved the result. Learning to work the camera (changing the fstop and the shutter speed…the ISO) plus styling the photos is new to me so it will take a while to really get the hang of it. But, I know that it will make my blog more useful as well as beautiful to my readers.

Holly Becker from decor8 blog…and me
Thank you Holly and Leslie for a great class. Looking forward to implementing everything I learned!
And…thank you for reading!
Thanks for stopping by The Colorful Bee! Stay in touch and never miss a post.
*Subscribe to receive an e-mail when a new post is up, HERE.
*Subscribe to receive an e-mail when a new post is up, HERE.
1 Comment
Posted in Uncategorized
Someone Stole My Lucky Charm!!
I am always amazed at people’s generosity and, conversely, their propensity for stealing things! For the most part, I’ve only experienced the good side of people…but every once in awhile – I see the ugly underside of humankind.


My company, besides doing decorative painting and design, also does home staging. Yesterday, I had to de-stage a home that sold very quickly despite it being the dead of winter. In the home, I had placed the first item I ever bought for my staging business…the Coco lamp.
The surviving twin!
This lamp has always been my lucky charm. Whenever I’ve placed it in a home for sale – the home sold quickly. I’m sure that there were many other reasons why the homes sold fast…but I do know that most people coming into homes I’ve staged have wanted to buy everything in the home. Maybe that should have given me an idea that people coveted my staging inventory – but I never thought someone would actually steal a fairly large item like this!! How does somone walk out of a house with this tucked under their arm? Someone must have noticed, don’t you think?
Back in 2008, I had an inkling that I wanted to enter the staging business, so I started to buy things for this new enterprise. This was the first thing I purchased. It sat for a while in my garage…but soon I was staging vacant homes – bringing in my other purchases from Ebay, craigslist and some high end estate sales. I had to do everything on a budget – but I think that my purchases were very wise and so in a few short years, I had enough inventory to furnish 6 or 7 homes.

In a $3.5 million home, the Coco lamps helped sell it in 3 1/2 weeks
Many home staging companies rotate their inventory every year or so and buy new – but I tend to keep my pieces around for as long as I can (especially when the pieces help to sell the home quickly). I would rather revamp them with paint, different fabrics – pile on different pillows and throws – rather than sell the items and purchase new.

Here they are in a more modest home – that sold in less than 7 weeks
What I loved about these lamps was that I could place them in an expensive home, a little cottage or a mid-priced property. I could put them in a living room, sitting room, Master Bedroom or an entryway on a console. That’s what I look for in an accessory – how many places can I use it?
If anyone knows where I might be able to purchase this lamp, I would love to know. I have looked on Ebay countless times (because I’ve wanted to buy several pairs of these lamps) – but to no avail. I don’t think it’s being made anymore. There are some numbers on the bottom – it says
Cat# CL2148. Date May, 2008. It was made in China. There’s also a bar code – and maybe if I go to my lighting store, they can look it up. The homeseller, a real estate investor, has offered to pay me for my loss. So – I hope that I can replace it!
But – the blogosphere is an amazing place…so I am asking my blog readers if they know how/where I can buy another one, I would appreciate hearing from you! I have a wonderful designer friend here on Long Island looking for me as well. She’s a fantastic researcher…so hopefully she will come through for me.
I would also love to hear from some other home stagers and realtors on how they make sure that the contents of their listings are not stolen. I have insurance – so I am safe there. But when something meaningful is stolen…there’s no insurance that will help you with that!
Thanks for stopping by The Colorful Bee! Stay in touch and never miss a post.
*Subscribe to receive an e-mail when a new post is up, HERE.
*Subscribe to receive an e-mail when a new post is up, HERE.
2 Comments
Posted in Uncategorized
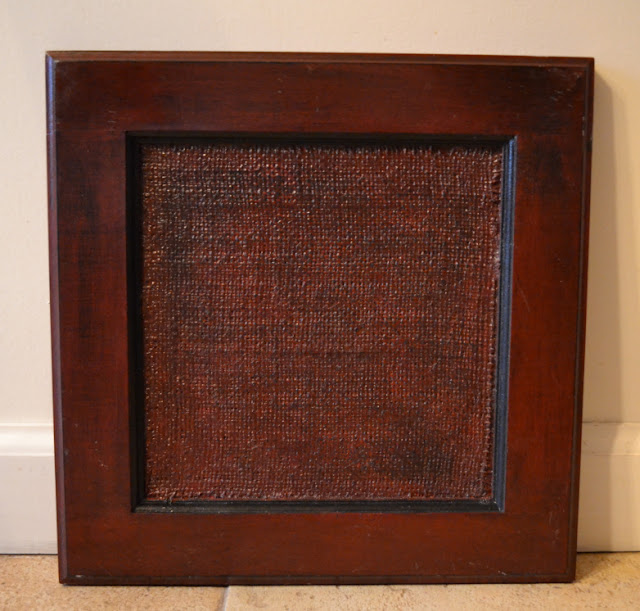
Glazed Burlap Inserts in Faux Woodgrained Wainscoting
Just a quick post today. I did a really beautiful project awhile back that helped amp up the beauty of this home. The homeowner wanted something different yet rich and more classicially traditional. Her entryway, especially her stairway to the second floor, was quite tall – and there was very little architecture. To help ameliorate (sorry for the high-end vacab…I was an English major!!) this “tallness,” I suggested that she add some wainscoting with panels and some crown molding. Once that was done, we went to work doing a faux mahogany finish (with a dollop of eggplant in the glaze mix).
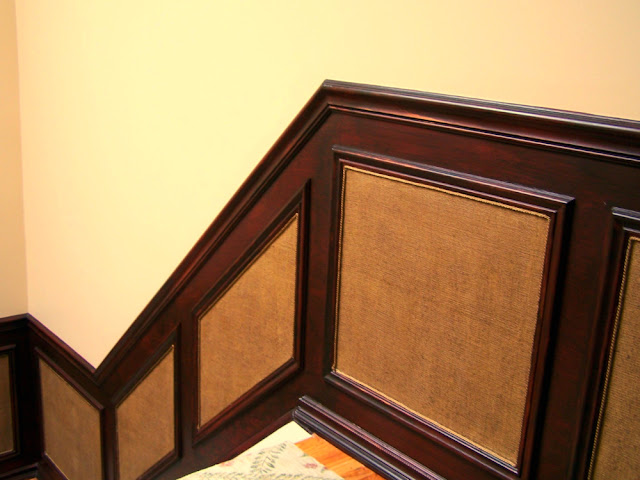

Once white and plain…
The Recipe…
The base color was a brownish red (Leather Red from Aqua Finishing Solutions). Then I floated Dutch Metal Gold – also from Aqua Finishing Solutions – on the edges for a little sophistication. It’s not quite visible in the photo…but that’s because it’s suffused under a glaze of Antique Mahogany plus some Eggplant Stain and Seal and a dash of Ebony (also from Aqua Finishing Solutions).
The finishing touch came by adding the burlap to the inserts. I purchased the burlap online – but you can buy it anywhere as long as it’s a burlap that has more of an open weave. If it’s tight, it won’t work – well, maybe it will but I don’t recommend it. I put it on with carpenters glue (Elmer’s). You need to try to get the edges as clean as possible. Mine were not perfect – so I added the cording to neaten it up. After the glue was dry, I gave the burlap a clear topcoat. The client wanted to retain the light color of the burlap but I darkened it a bit with some dark brown glaze.
I’ve done this finish on furniture as well. You can put it on just about anything that has an insert (it would look beautiful as an insert in a ceiling panel!) Come to think of it, I have an end table with a raised molding around the top (sort of like a tray table top) that could use this finish!

Above is a sample I did for a client where I painted and glazed the burlap in the same color. I just added some black accents to the sides of the insert. Here you can see the burlap weave better – it’s more open. And you can see the edges. If you don’t get it down close to the edge – it will look unfinished. In the darker sample you don’t see the edges quite so much…but on the lighter wainscoting inserts that I did for my client – the edges were more noticeable. But, no big deal – that’s what they make cording for!
It’s a beautiful finish. So – give this burlap finish a try in your own home!!
Linking this project up with Between Naps on the Porch
and some of my blog friends HERE
Thanks for stopping by The Colorful Bee! Stay in touch and never miss a post.
*Subscribe to receive an e-mail when a new post is up, HERE.
*Subscribe to receive an e-mail when a new post is up, HERE.
11 Comments
Posted in Uncategorized
Designing the Perfect Nursery, Part 1
Maybe it’s because my youngest daughter, Jessica, is pregnant and due in April…but I thought it would be good to do a post on how to create the perfect nursery.


A sonogram of my soon-to-be-born granddaughter, Peyton. 8 more weeks to go!
I started to write this post more than a month ago and then one of my readers asked me to do a blogpost on it as well. The post got pretty long, so I decided to break it up into a Part 1 and Part 2. I know that some blog readers will stay with a long post, but most will skim! So to avoid that – I broke it up!

Fun, colorful and practical design from Sarah Richardson via decorpad
The fun part of designing your nursery is picking the colors and the accessories that will go in the room. But function is so important when you are designing that I had to include that in the discussion. So whether you are expecting a baby or know someone who is, hopefully you’ll learn some useful tips and advice that will not only make your nursery a beautiful one – but a safe place as well.
The Basics:
Where Should the Nursery Be: If possible, have the nursery as close to your bedroom as possible, so that you can attend to your baby quickly during the night. If you would like to have the baby in your room in the early months, you may want to purchase a bassinet.

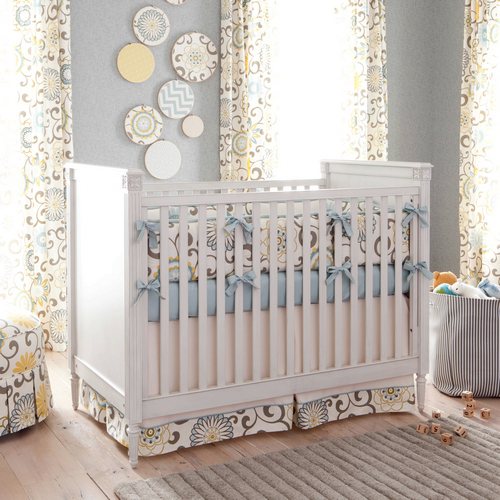
A beautiful crib for the nursery, via Lucas Studio
Furniture: The crib – make sure that it is highly rated for safety so that you and your baby can sleep soundly. Check for any recalls and read consumer reviews of the product you select. Many cribs now change into youth beds, so think of the crib as an investment that will last quite a long time. Make sure that you place the crib away from the window to avoid drafts and excess noise. Also…avoid having the crib near any heat or AC vents.
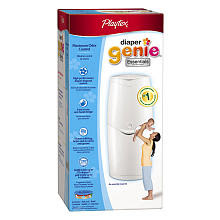
The Changing Table etc: Purchase one with ample open storage underneath so that you can quickly and easily change your baby safely. If you have the room, add an additional dresser to store more clothing, linens and other necessities. If space is really at a minimum, forego the changing table and add a soft pad and cover and place on top of the dresser to change your baby. Whether you use the changing table or the top of the dresser, a diaper stacker on the wall nearby will help make changing your baby much easier. A diaper disposal unit not too far away will also help you! The Diaper Genie II by Platex is very highly rated by users.

Have a Sitting Area: You want to sit down and nurse or read to your baby so make sure you have a comfortable chair to sit in. A rocker would be ideal. A small table or basket to hold books and some small toys would also be ideal.

Images via Finnian’s Moon
Bedding: There are so many options in this category but, in general, if you keep the color scheme one that blends with the other items in the room – you will have an easier decision to make! First off, you’ll need a mattress cover – preferably two, so that when one gets soiled you have a backup. Hypoallergenic ones are available and I think they are a great choice.

Bedding from Carousel Designs
You’ll need a snug fitting crib sheet. Ones made of flannel are great for the cooler months – and cotton for the spring and summer. You will not need any blankets. Today’s parents keep their babies’ airway passages clear by not having a blanket covering them. Also, bumper guards – while they add color and style to the nursery – are not being recommended because they could contribute to SIDS (Sudden Infant Death Syndrome). Pillows and stuffed animals should also be avoided in the crib.

This is one of my favorite images. Design by Lisa Mortensen; Photography by Stephen Karlisch
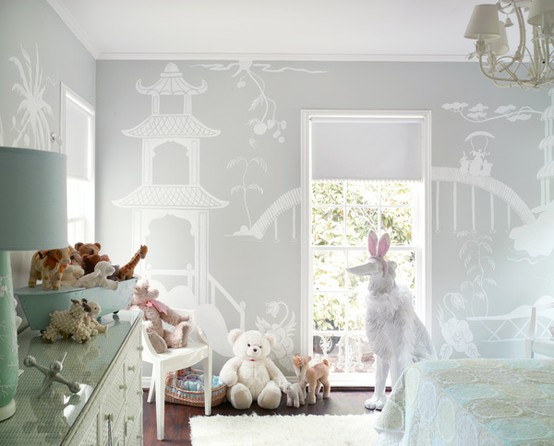
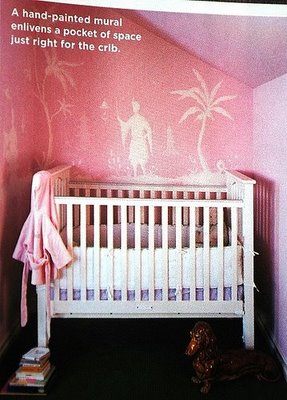
You can opt for a nursery rhyme theme – but before you know it, your child will have outgrown it! In the nursery below, designed by Carolyn Roehm, the handpainted Chinoiserie mural is unexpected, beautiful – and a very imaginative flourish for the youngest of eyes.

Babies are never too young for Chinoiserie!
You can also stencil something colorful on the walls. The sky is the limit for stencils. Choose something that you love and chances are your baby will too. Another option is to use appliqués. These vinyl pieces come in many styles and colors, can be changed in an instant and they won’t ruin your walls. Check Blik and Etsy for an assortment of style options.

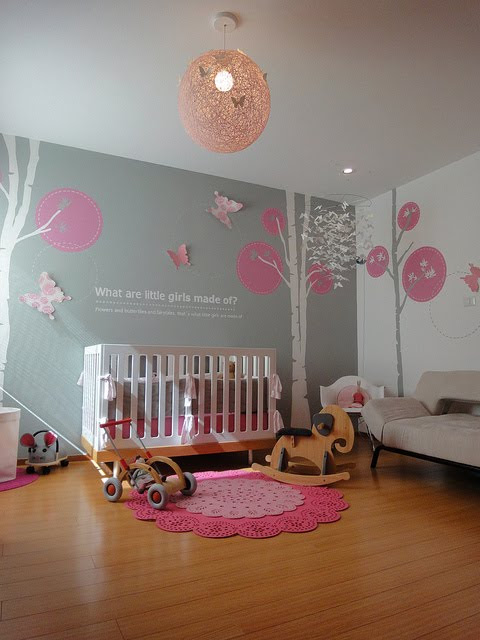
A modern girl’s nursery via Spearmint Baby
Paint Colors: Color is of course very personal. But I think that a soothing color is best for a nursery. A soft pastel blue, pale green or soft pink would work the best though. Make sure to paint several months before the baby arrives and use a zero or low VOC paint. For some visual candy for your baby, you can embellish your walls with a beautiful hand painted mural with a landscape theme – which can serve as a beautiful backdrop for many years to come.
More ideas to come…next post!
Thanks for stopping by The Colorful Bee! Stay in touch and never miss a post.
*Subscribe to receive an e-mail when a new post is up, HERE.
*Subscribe to receive an e-mail when a new post is up, HERE.
5 Comments
Posted in Uncategorized
My Latest Project: Fixing Faux Finishes in a Home for Sale
The Entry before…
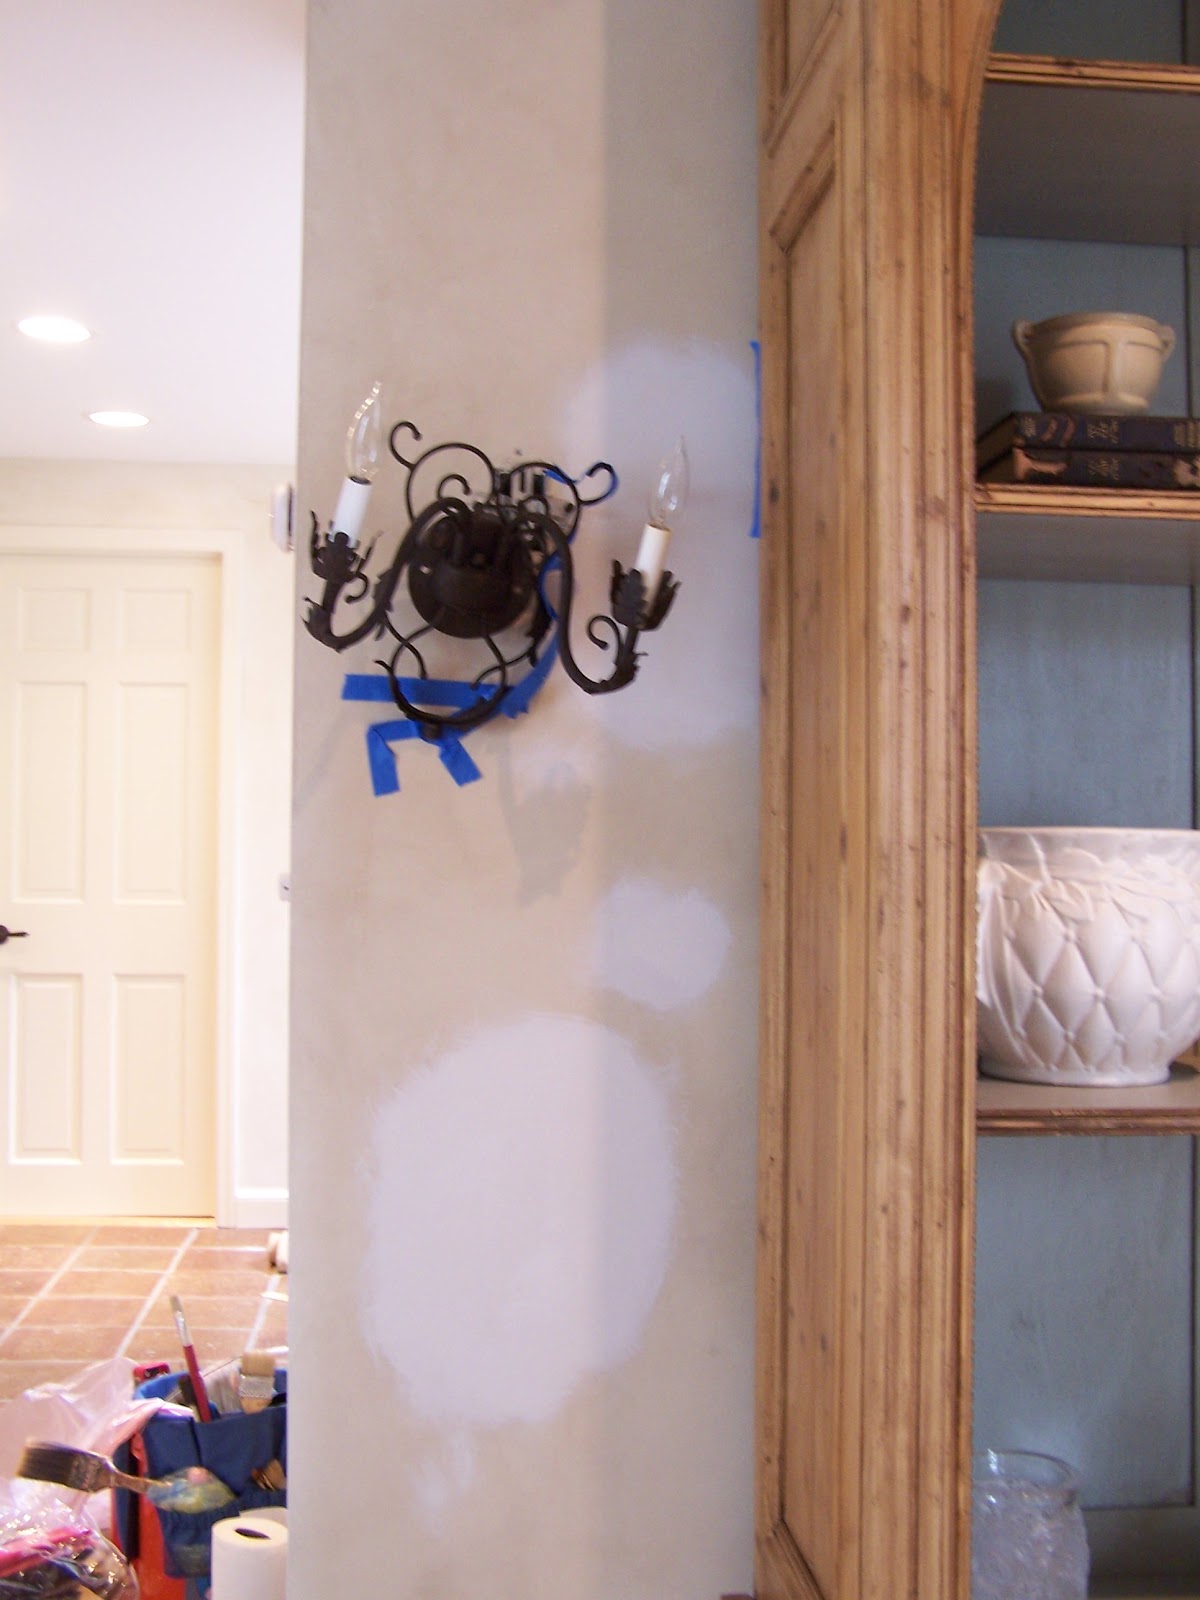
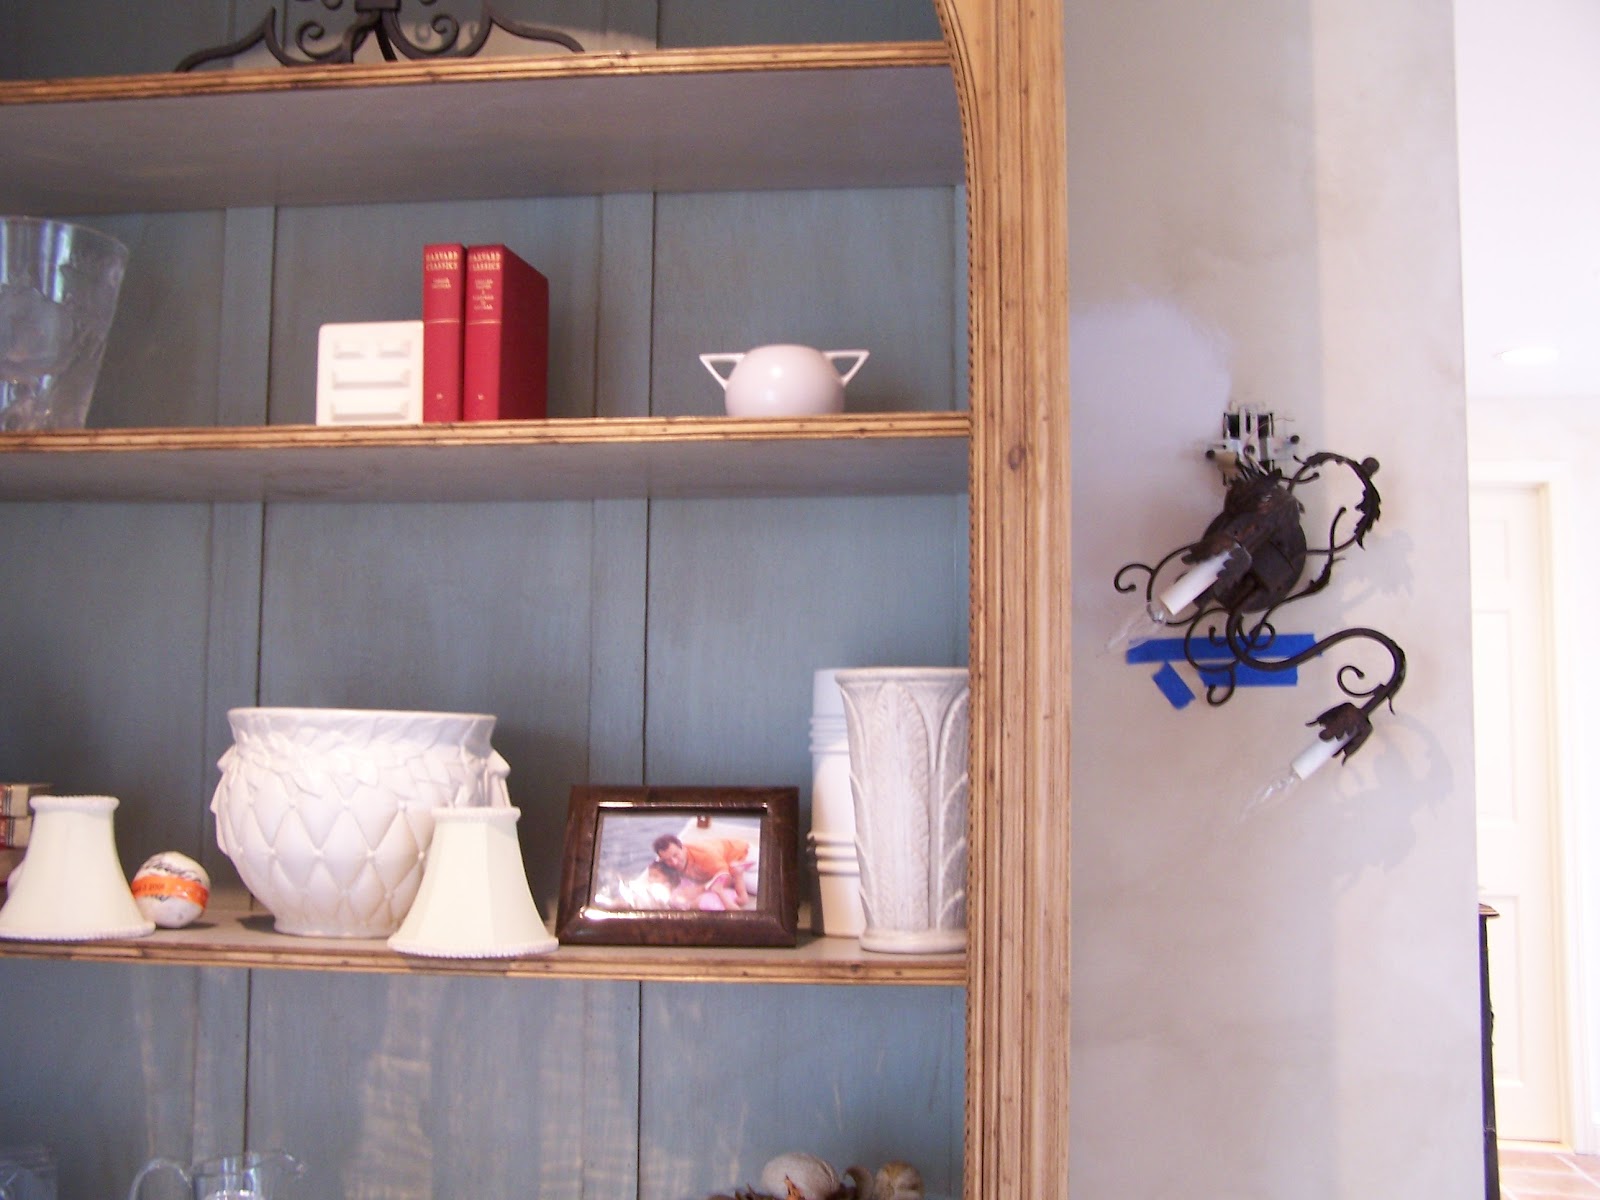
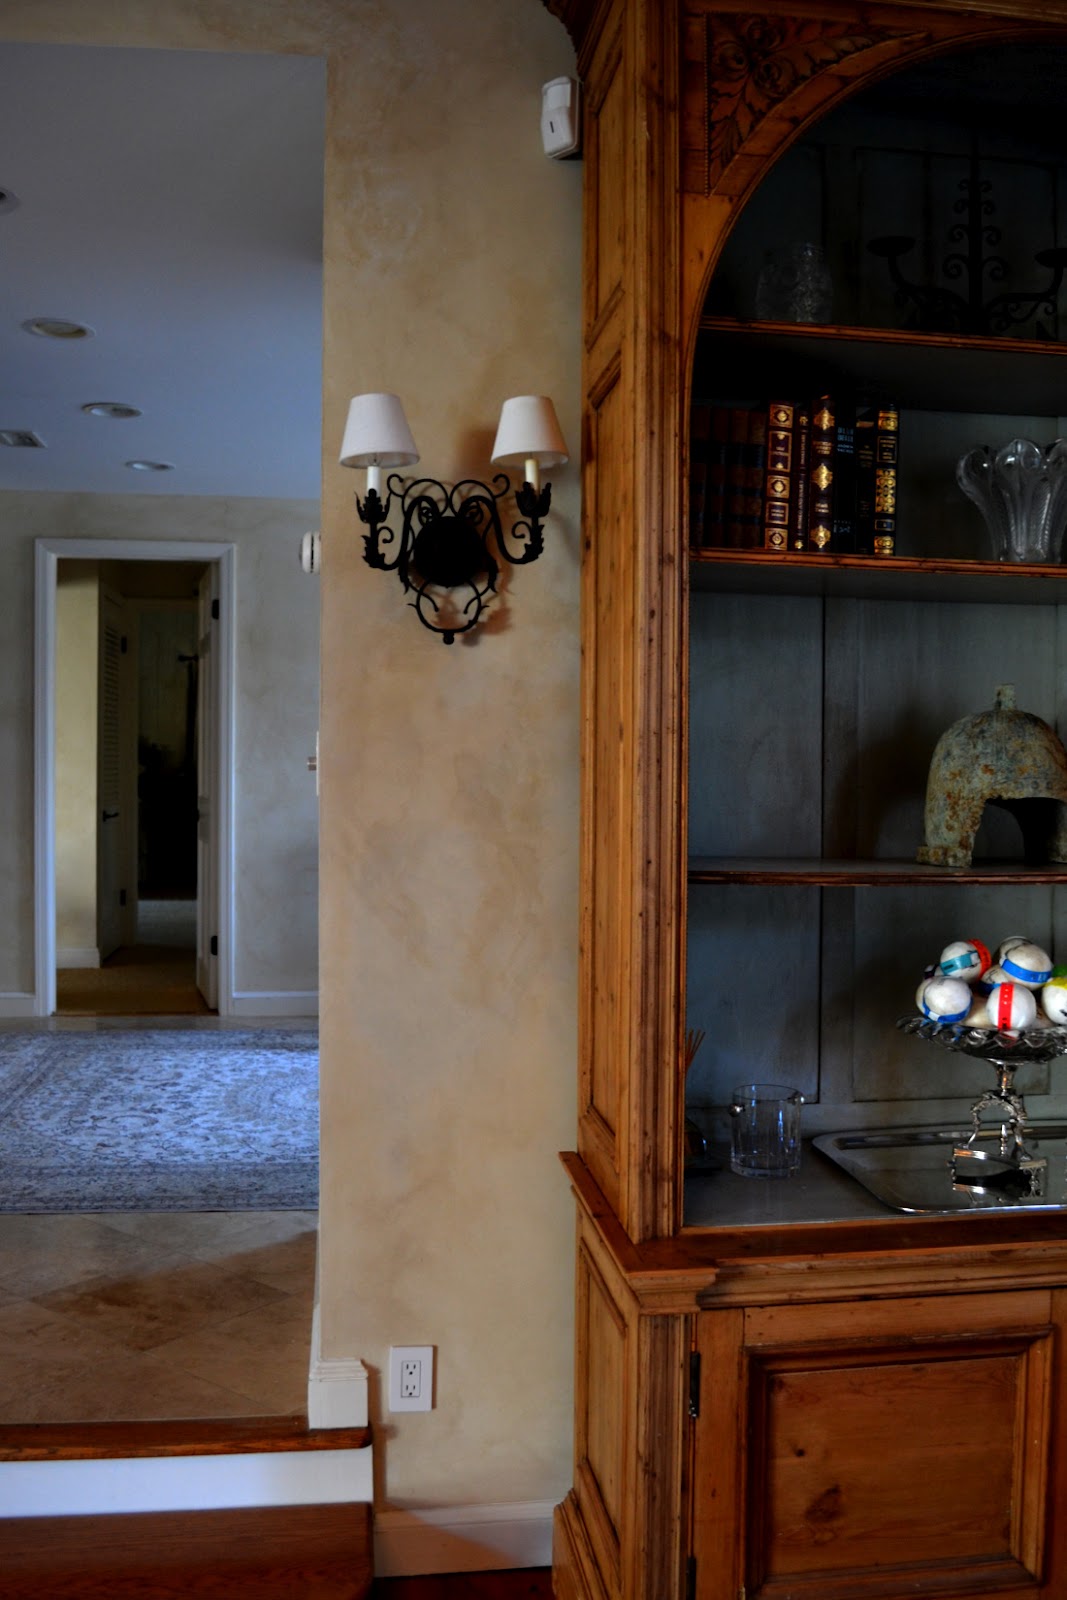
Sometimes I am called on to fix a faux finish, instead of only just doing one. This beautiful home is currently for sale in Southampton NY for $6,975,000. There were numerous changes done (adding light fixtures etc) and of course some cracks that resulted over the years and needed to be fixed – and so the owners wanted the faux, that had been done many years ago, fixed rather than go through the expense of painting the entire house.
During…
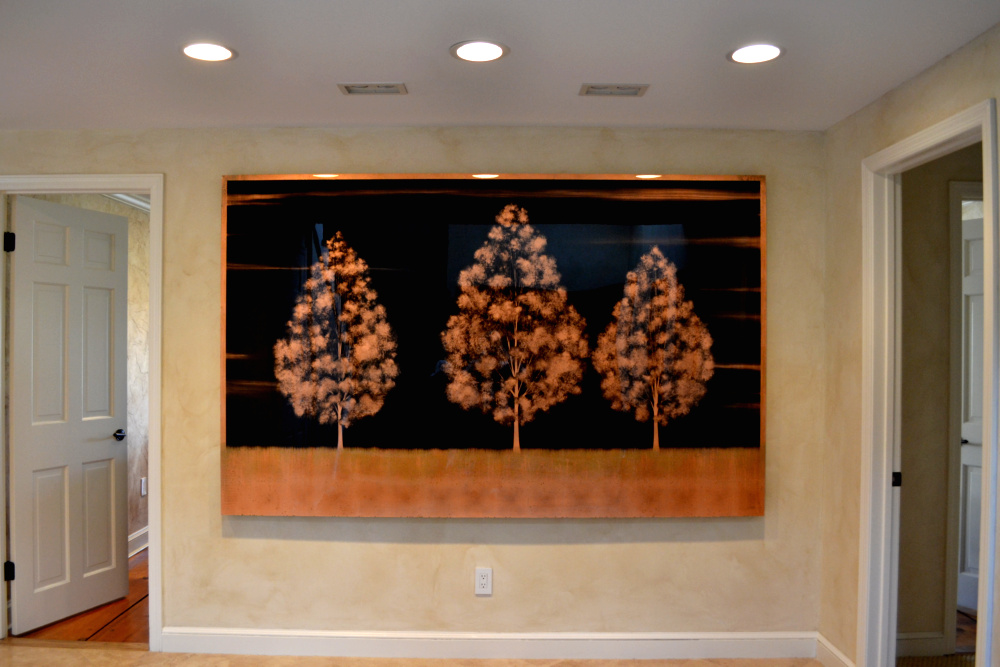
Entry…After
Before…
Living room before…

After…
After…

Living room…after
Living room
If you have never tried to fix a faux finish (especially when you didn’t do the finish in the first place as in this case), it’s one of the hardest things to do well. What happens is that you can’t just dot in the color into the patched and primed spot. It doesn’t work. If you try to do that, it just creates a halo effect and you can see where the “join” is. You have to create a color that is the closest to the base color and then you swish the color in…blending it in without following the outline of the patch. Then add a little darker glaze and feather that in – as in the drifts that are part of this finish. Sounds easy but it wasn’t at all.
The Den Wallpaper Fix
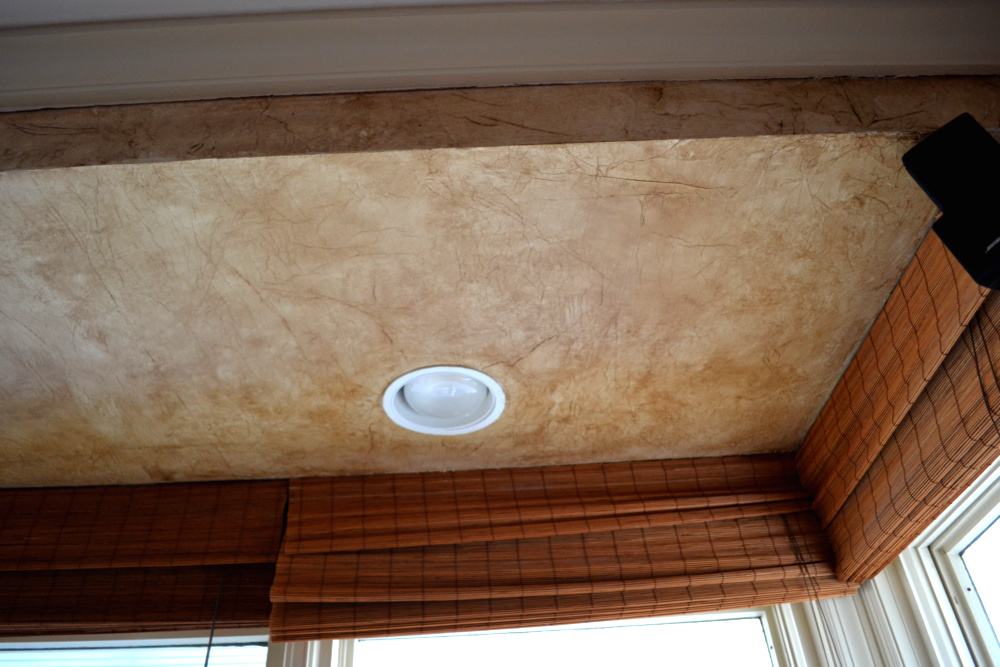
I also had to fix many areas in the den. Oh boy – this was a job. I had to match a wallpaper of all things. First, the ceiling above the window seat…

Before…
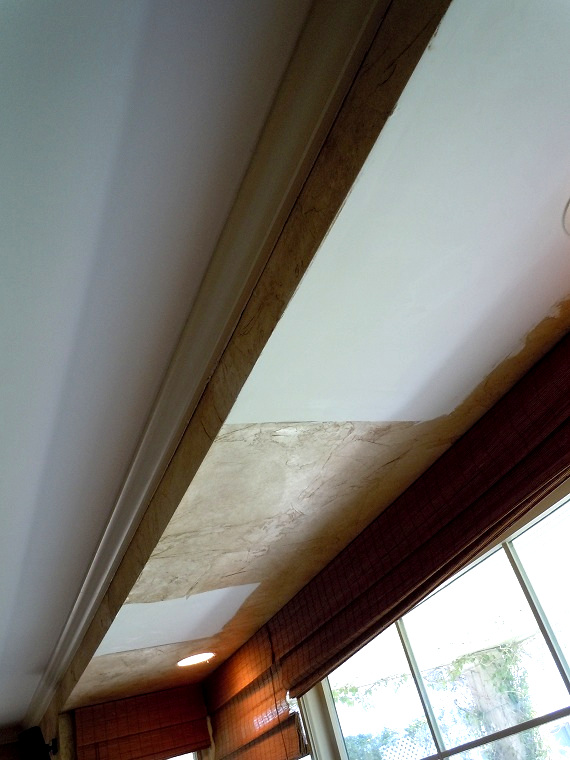
Before…
After…
After…
Since the home sellers did not have the paper that was used, I had to improvise. I primed the areas, then used gift tissue, slightly wrinkled (like I did on my Bookcase Project) then painted it. I created a glaze color that matched the color of the paper and then glazed the whole ceiling.
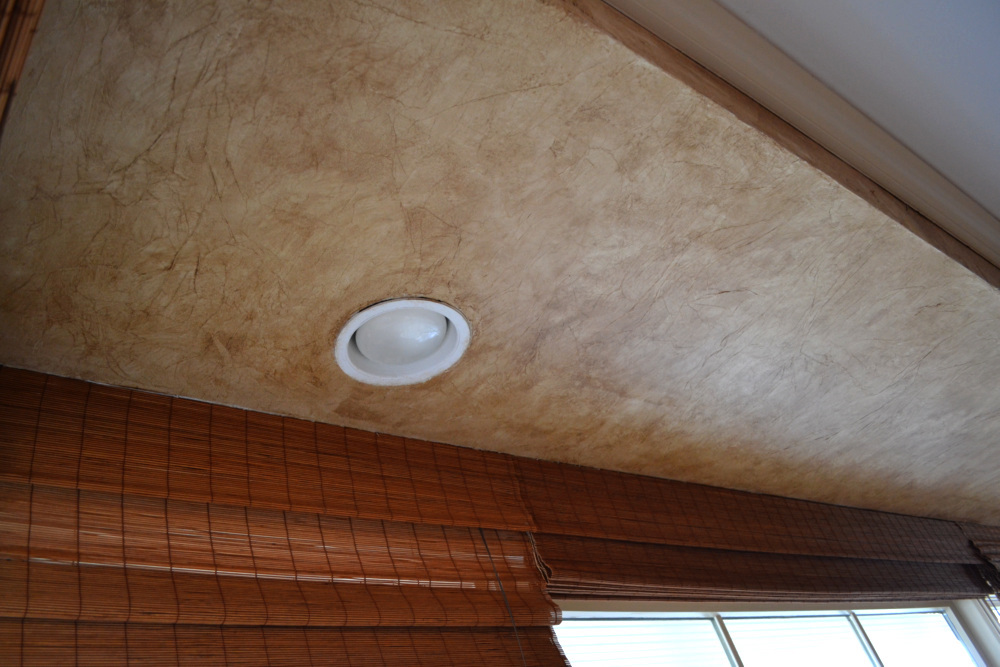
By the other window in the room there was more damage…
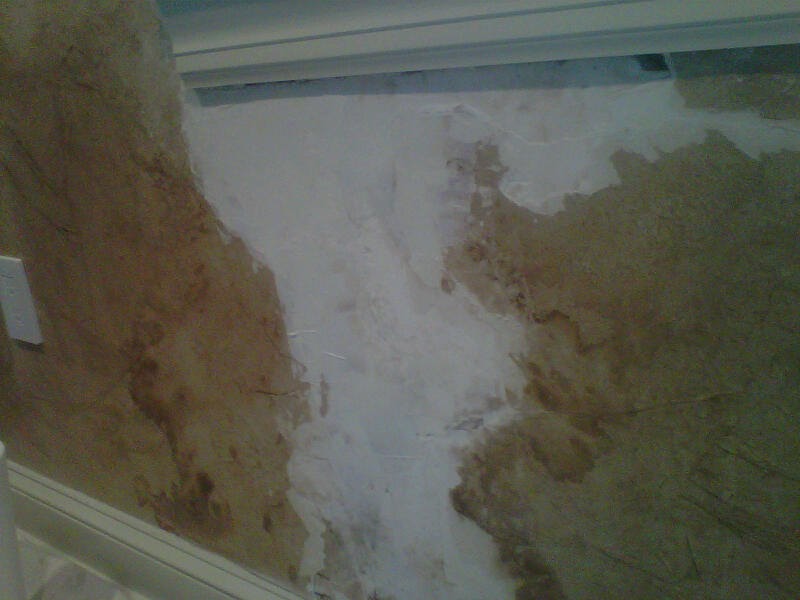
Before…

After…
Blending it in without it looking like a different paper/finish was a bit difficult – but it came out better than even I thought it would! Sometimes – I surprise myself. The room is really a beautiful one – so it was worth the extra effort.
After…
There were some other areas throughout the room that were discolored and we had to devise a color that would blend in best to disguise it. But – the room looks really great now.
The only full faux finishing that we did in the home was in the dining room. I just created a very soft, mottled finish that warmed up the space.

The home looks really wonderful and warm so I hope that all of the effort nets the owners a sale. It took us all week to get the work done – so I apologize for not blogging as much last week. Hopefully this long post will satisfy!
Some knowledge of color theory and faux finishing techniques can really help save time and money. In this case, the home sellers would have had to have most of their walls re-painted and the den walls would have had to have been stripped of the wall paper, primed and re-painted. That would have been costly – time and money-wise. As they were having an open house over the weekend, there wasn’t the time to do all that. So…once again…Faux to the Rescue!
If you are interesting in seeing this beautiful home, please call the realtor, Tim Davis of Corcoran at 631 283-7300. The website for the listing can be found HERE
You may be interested in another project – a $3.5 Million home that we staged that sold in 3 1/2 weeks. Click Here
Linking this project up to these blogs…
Thanks for stopping by The Colorful Bee! Stay in touch and never miss a post.
*Subscribe to receive an e-mail when a new post is up, HERE.
*Subscribe to receive an e-mail when a new post is up, HERE.
2 Comments
Posted in Uncategorized
A Late Valentine’s Post: The Best Present I Ever Received!
How Much Do I Love My Husband!!

This post is almost a week late, but I just had to write it and share with everyone. Last Tuesday morning, at around 6:40 AM I was about to leave for an early meeting and surprisingly my husband was downstairs waiting for me by the kitchen table. Unusual for him, now that he’s retired, to be up that early but – I saw the card, the candy box, the roses and another package wrapped in pink and I knew why he was up! I hadn’t even wrapped his gift or signed his card yet – I thought I had ‘til the night time when we were going out to dinner to exchange gifts. He had that slight smirk on his face, so I knew that I had to open the gifts right away instead of later. So, I opened the card (which was lovely) and thanked him for the roses and the candy and then I tried to guess what was in the other package – but it had such a hard feel and a weird shape that I couldn’t guess by feel. When I opened it – I was so surprised…and happy beyond belief. It was the best present I ever got!

My husband took what was left of a trophy I received for being Queen of the Prom (hate to say it – but the year was 1969!). I only had the female figurine left after all these years and not the base with the plaque because my ex-husband broke it (don’t remember why he did that either). But I carried this little token of my beautiful past around with me maybe out of vanity – but more for just remembering some nice things that have happened to me in the past, I kept it in a junk drawer in my bedroom because I didn’t know where else to put it.
Well for Valentine’s Day my wonderful husband found the figurine and went online to order a base for it and the plaque and he affixed the figurine on top. What a surprise! It was definitely the best Valentine’s present I ever got. He took me to a wonderful restaurant that night – and although I was tired from working all day…I was the happiest woman in the place, still beaming about my lovely, thoughtful gift from my husband!
Just a quick note about my ex-husband who broke the darn thing – we are still friends to this day and, in fact, his wife works with me and I consider her to be one of my best friends. She is a great person and she is one of my biggest cheerleaders. Unusual – yes I know…and, thankfully for her, my ex grew up and became a wonderful husband and father and he stopped breaking things!
Thanks for stopping by The Colorful Bee! Stay in touch and never miss a post.
*Subscribe to receive an e-mail when a new post is up, HERE.
*Subscribe to receive an e-mail when a new post is up, HERE.
Leave a comment
Posted in Uncategorized


 Decorative Finishes
 Interior Design
 Home
Home Garden
 Holiday
 Makeovers
 My Life
 Business
 Tutorials
 Videos
 Paint
Paint