When I married my husband, I moved into a house with a lot of 70s type wallpaper. For a decorative artist like myself – that’s like being in purgatory (or worse!!!). Now, I love wallpaper…well-done, handpainted or beautifully textured or patterned wallpaper. But – the living room, the powder room, the kitchen, the dining room – the upstairs baths and all the bedrooms had 70s era wallpaper….and I just couldn’t live with it. So, slowly but surely, I began to remove all of it. I will feature more of the before and afters in coming months. I only have one last wall of wallpaper to remove – a camouflage paper (spare me) in what will become a nursery for my new grandchildren.
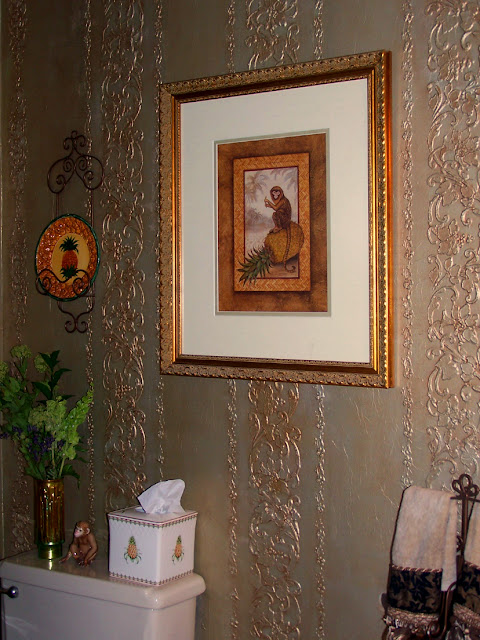
Here’s a picture of our powder room right after I did the last transformation…first removing all the wallpaper, then oil priming, painting and doing an embossed stencil and tissue finish. I say “last” transformation because the finish was the same – only the room was, at first, painted an antiqued gunmetal silver – which I really loved. But as I was re-doing my home, the colors of adjacent rooms were getting warmer and warmer – so the silver just didn’t go with the palette I was coming up with. I chose a softer and warmer metallic color – called Veridine (from Faux Effects). Then I gave it an antique bronze glaze. I covered the switchplates also – to give it a more uniform look.
My inspiration photo done by Melanie Royals of Royal Design Studio
Here is the first color of the powder room finish – a gun metal silver
The vanity and countertop were really horrendous and way past their prime – but my husband didn’t want to buy anything new because the vanity hid all the pipes underneath (which also include some pipes for the washing machine in an adjacent room – don’t ask!). This powder room has 7 sides – it’s really an oddity and I could have gutted the whole thing and started over – but that would have been too much $$ for my husband to handle. So, I made do! I sanded and primed…painted and glazed…and clearcoated the vanity and countertop and it’s held up beautifully over the years.
I don’t have a before picture of the powder room – but I do have a snippet of the wallpaper. Was it horrible?…not really. But it was dated and it did’t really say anything about me and the spirit I wanted my home to portray. This room and the wallpaper were someone else’s idea of beauty – not mine. So, I had to change it.
It was perfectly nice – but it didn’t say “me.” And coupled with the peeling, orange yellow vanity and countertop – it had to go!
About the Wall Finish: The one thing that is difficult about doing this finish is the amount of time and patience it takes to do it. It’s not an overnight sensation…and trust me – I needed a shrink during and after the process. When you are doing an embossed, raised stencil on a wall – you first have to stencil most of it on the wall first in a light tone. Why? Because when you do anything raised/embossed on a large surface – you can’t easily go from design to design in a row…because the plaster or whatever you are using to make the design raised – is still wet. So, you have to jump to another section that’s dry in order to do your next raised/embossed area. So, in this design that I decided on for this room, I first had to make the design “stripes” level and equidistant – I had to stencil just about everything in a tint on the wall before I could trowel any material through the stencil to make the raised design. I hope I didn’t lose anyone here yet!! You also have to do this to make sure your vertical design is level and not “off.” So – it’s a process…that takes a lot of time.
Whenever I price this for a client, they always look at me a little crazy because they see the finished product and think “Oh – that’s beautiful…I want it.” But when I explain how much time and precision it takes to pull it off…they back off. Only interior designers so far have said “No problem – I love it. Let’s do it!”
A closer look: You’ll see the slight wrinkled texture on the wall. You don’t “have” to do this…but I laid gently wrinkled gift tissue over the entire wall as I was painting the color on the wall. One of the reasons I did this was because my surface was not 100% perfect – it showed some leftover wallpaper lining and I just wanted to give the wall a little extra texture. If your walls are perfect – you do not have to do this step and I wish that I could have skipped it!!
A closer look at the wall finish – see the slight wrinkled texture?
One very important note about doing an embossed stencil design with a tissue finish: Once your tissue is on, you have to make sure that the tissue lies flat next to the raised part of the design. I had to flatten out the tissue many times and I also had to pin prick some of the bubbles that this finish naturally creates. Did I get every single one perfect? No – but overall it looks good and you can see every part of the design. Next time I do this, I won’t choose such a small stencil design – you can see it above to the left of the larger design. That was a nightmare to get all the tissue to lay down around the design. So – don’t do this! Choose larger designs to emboss – much easier!
And another tip – if you have to go through some curved surfaces like I did…pick a simpler design!!
For the vanity and countertop: I first sanded any chipped spots, then oil base primed it and then painted the base in Off White from Faux Effects. To antique it, I used a brown and gold glaze. The countertop – I sanded it (A-LOT!!!) and then I oil base primed it in a tinted dark brown primer – and then I did several coats of Modern Masters’ Statuary Bronze. I then did several coats of Faux Effects Satin topcoat called Varnish Plus. I cannot tell you how much I love this product. I used it on this countertop and while I was re-doing my kitchen, this powder room became my “slop sink” when I was doing any other type of painting or cleaning or washing dishes. The countertop stayed clean and beautiful after a TON of punishment!!! Enough said – go buy it!!!!

For the interior section of the vanity, I painted it the Veridine color and then stenciled Royal Design Studio’s Small Victorian Grille. Modern Master’s Statuary Bronze surrounds it – but I sanded it back to age it. I kept the same knobs – only I painted them in the Statuary Bronze. I plan on changing them soon. Anyone have any suggestions? In my kitchen I have the French Birdcage ones in oil rubbed bronze and I love then – so that’s a possibility. But I would love some other ideas.
Future Changes: I am also going to do some other changes to the room. I’d love to put something different in that center panel in the vanity. A handpainted monkey or pineapple? Or is that overkill? I also want to perhaps get a new stone or granite top for the vanity…plus a new sink, faucet and light fixture. I would also love to do a raised design on the panel right below the countertop – I think it’s calling out for something! And finally, I’d love to do something special to the ceiling. Right now it’s a mid tone sage green, which is nice – but it needs some pizzaz! I’d like to add some moldings as well on the top but with 7 sides…it’s a challenge. I had though of spray painting a thick rope in bronze and then attaching it.
Would love to hear from all of you on what you’d like me to do with the room…and then I’ll post the changes.
Thanks for coming by to see this project! For another project I did with raised stenciling, Click Here.
Sharing this with…


 Decorative Finishes
 Interior Design
 Home
Home Garden
 Holiday
 Makeovers
 My Life
 Business
 Tutorials
 Videos
 Paint
Paint
Linda,
You never cease to amaze me. Love, love, love what you did to your bathroom. Thanks for sharing the details of this beautiful project.
Thanks Mary! High praise from someone who is extremely talented herself!
You HAVE been busy!! Very nice job!! What a change. Well done. blessings ~ tanna
Great bathroom and you have a beautiful blog! Following back and thanks for visiting!
Girl, there ain't no way I'd be doing this technique on a project of this magnitude! So, I guess I'll admire yours because it looks stunning!
Thank you for becoming my newest follower and I'm returning the favor! 🙂
I too hate old wall paper. I'm glad you were able to change what you didn't like. I love the raised embossing. Thanks for linking up at Making Space Mondays! Hope to see you at the next party. -Tabitha
Thanks Tabitha for commenting on my blog. I will be visiting your site soon again!
nice work you did. very impressive and it must have been very difficult for you. but over all you did great work.
Stuart Elliot
Hi Stuart. It was a labor of love to do this powder room! But it turned out really well. Thanks for your comments. I am off to visit your site!
Linda
I pinned this bathroom on my wall decal board. this is so me!!! I hope to soon build my home, and so want this stencil in my master bath! Is this stencil one that I could buy, and how long ago did you do this? I live in Indiana, and you probably live far. Can you please help me? Thank you for your time, and hope to hear from you soon!
Hi Dana – thanks so much for a wonderful comment! I am blushing! I can help you. 1) I was thinking last night, as I was tossing and turning because I couldn’t sleep, that I could do a more detailed tutorial and/or a video tutorial on how to do this technique. It takes time and patience – but the outcome is really worth it. Yes, most of the stencils are available – used Royal Design Studio stencils mostly (http://www.royaldesignstudio.com). The very small stencil is probably not available anymore – I think I may have bought it at Michael’s – so long ago I can’t remember! and 2) I may need a guest blogpost on another blogger’s blog – and if I do this I could alert you as to when and where – and use this to help you as well.
Hi Linda, I wrote you back on Dec. 6th., 2013, as to how much I admired your stencils you used in your powder room. I checked out the website royal design studios. I went through every stencil heading and I cannot find the large floral/scroll stencil you used. I don’t mean to bother, but I am sincerely looking for this stencil!!! If you still have yours, would you be willing to sell yours, since also the one from Micheals was discontinued. I look forward to hearing from you, and did you ever make that tutorial? Sincerely,Dana
Hi Dana…
I looked and looked and looked on her site and I could not find that stencil I used either! So, she must have discontinued it. That happens. If you really want it, you can purchase it from me but it is really pretty “old” and used by now…and so are the other ones I used. So, I have some recommendations for you.
Small Micah- I used this one for the corners of the room
http://www.royaldesignstudio.com/collections/furniture-stencils/products/micah-classic-panel-furniture-stencil
Large acanthus swirl border – can take the place of the one that is discontinued. It will even work better!
http://www.royaldesignstudio.com/collections/border-stencils/products/endless-acanthus-swirl-classic-border-stencil
19th century border – you can use this for the small little stencil and, in fact, it will work better as well.
http://www.royaldesignstudio.com/collections/ceiling-stencils/products/19th-century-border-stencil
I will try to do a tutorial on this for you. It is a big commitment of time and patience – I have to be honest with you. But you seem pretty doggedly determined!! I have one last idea for you…an easy way to do this technique would be to use random stencils – instead of linear ones. The most problems I had…and the most time consuming portion of the technique is getting all the stencils lined up perfectly. A random pattern would give you more leeway!!
Let me know what you think of these stencils for your project!!
Linda
Hi Linda, Thanks for such a quick reply! On the tutorial, doing the tissue effect is pretty, but applying on a smooth surface, isn’t a big deal to me. I did check out your links, and so appreciate the time you took, to hunt down those stencils, but my heart is set on the ones you chose, because I researched the site also, to see if I might like another stencil better. I so wish I could have come across your pin on pinterest sooner, but have only been pinning for less than a year, and I may go for awhile before I pin again. I don’t care that the stencils are used, if you’d still be willing to let me get them. If you want to talk in person, my phone is:317-908-5373 cell, 219-263-3610 home. I don’t work, and go to church on Sunday morning, otherwise any time you call would be fine. Dana
Hi Dana…sorry that I have been out of the loop. I had a terrible back problem for the past few months and I finally got some answers as to what was going on with me. I still have a lot of pain but I am going to a chiropractor – which is helping – and next week I see a pain management doc.
Please accept my tardiness. I will look for the stencils over the weekend. Do you still want me to call you?
Thanks,
Linda
Yes!!! I thought that you had given up on me and was disappointed. I am so sorry to hear about your back, as I’ve also experienced myself, and is no fun. I will pray for your recovery, and hope to hear from you soon! Thank- you for responding back, I have personally had a rough week myself, so I truly understand. Talk to you soon!