
-

-
Subscribe
Thanks for stopping by The Colorful Bee! Stay in touch and never miss a post. Subscribe to receive an e-mail when a new post is up, HERE.Sponsor
If you're interesting in advertising on The Colorful Bee, click here to learn more.Contact
You can also email me at Linda.Leyble@gmail.com -


Categories
Subscribe
Popular posts
-
Recent Posts
Blogroll
Links

Tag Archives: before and after
The Custom Blue Chalk Painted and Stenciled Coffee Table
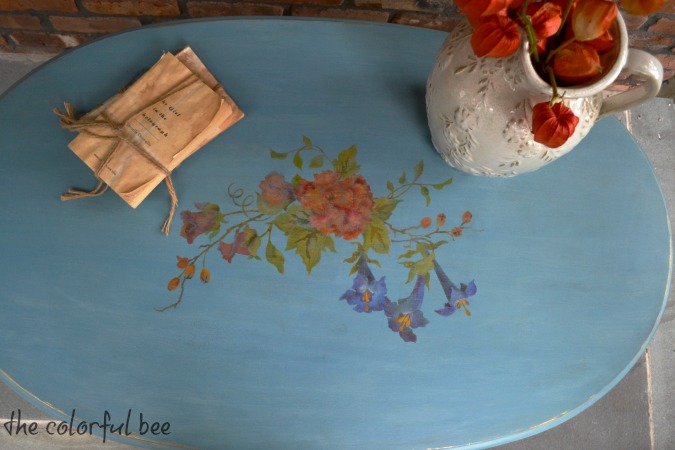
I finally finished a coffee table I had been working on for a while. I didn’t want to post it until I figured out how to tame the super shine I was getting from the wax I put on the table. I figured it out soon enough…made the necessary adjustments (not hard – a little more sanding back) and it’s a beautiful finished table. (more…)
Thanks for stopping by The Colorful Bee! Stay in touch and never miss a post.
*Subscribe to receive an e-mail when a new post is up, HERE.
*Subscribe to receive an e-mail when a new post is up, HERE.
4 Comments
Posted in Decorative Finishes, interior design, Makeovers, Paint, Tutorials
5 Things to Paint in a Day (or Less!)
I always need some instant gratification…how about you? I thought I’d post some easy things to do when you want to update some items you already have in your home. Paint is the quickest, easiest and least expensive ways to transform just about anything!
Mirrors…
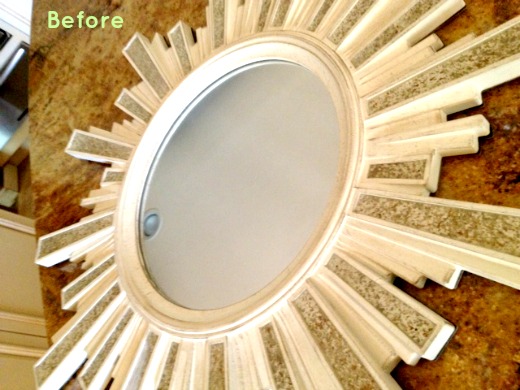
And after… (more…)
Thanks for stopping by The Colorful Bee! Stay in touch and never miss a post.
*Subscribe to receive an e-mail when a new post is up, HERE.
*Subscribe to receive an e-mail when a new post is up, HERE.
A Blog Reader’s Wrought Iron Staircase Dream Come True
I just love it when readers of my blog call or email me to help them create a dream they have in their head for their home. One reader (actually a husband and wife) emailed me a few months ago to see if I could help them gild (gold leaf) a powder coated railing they were having built and installed in their home. “No problem,” I told them in a follow-up email. “Are you sure you want it “gold leafed…real gold leafed?” I asked. “Yes!” was the answer.

The Inspiration Photo
Thanks for stopping by The Colorful Bee! Stay in touch and never miss a post.
*Subscribe to receive an e-mail when a new post is up, HERE.
*Subscribe to receive an e-mail when a new post is up, HERE.
2 Comments
Posted in Decorative Finishes, interior design, Makeovers, Paint, Tutorials
Making a Real Estate Office “Pretty”: Part 1
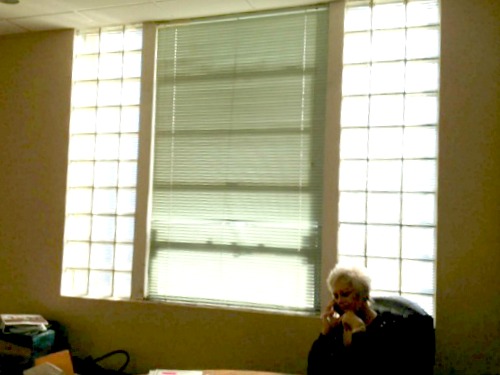
A very good friend of mine, Dianne Scalza, just opened up a new real estate franchise – Exit Realty All Pro in Bay Shore NY. Dianne is a colorful, dynamic and fearless woman and so when I saw her private office – all beige – I knew I had to feminize it and bring more color and “Dianne” into the space. Luckily, she asked me to help make it her own.
Before the transformation
…And we just had to do something about those glass blocks (with no budget to remove them. Tomorrow on the blog I will show you how we transformed the window!).
She needed some extra storage in her office but she didn’t want ugly file cabinets – so she brought along a bombe chest that she had purchased 10 years ago. A bookcase was also a priority – so I went in search of something that would work in this feminization of a boring real estate office. I found just what was needed on Craigslist – for $60!
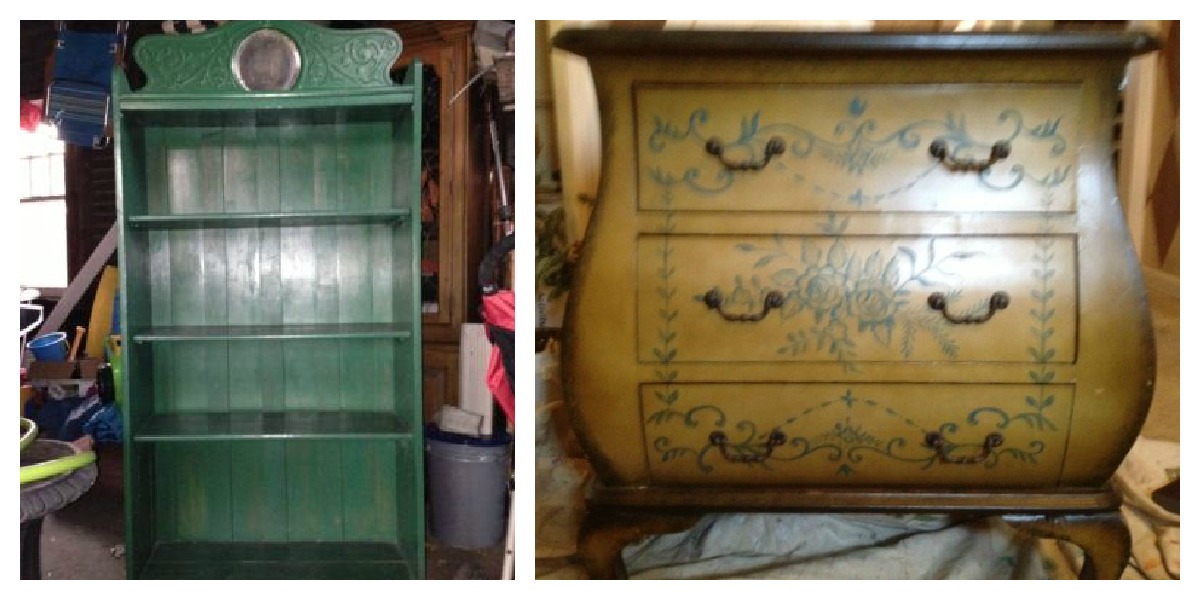
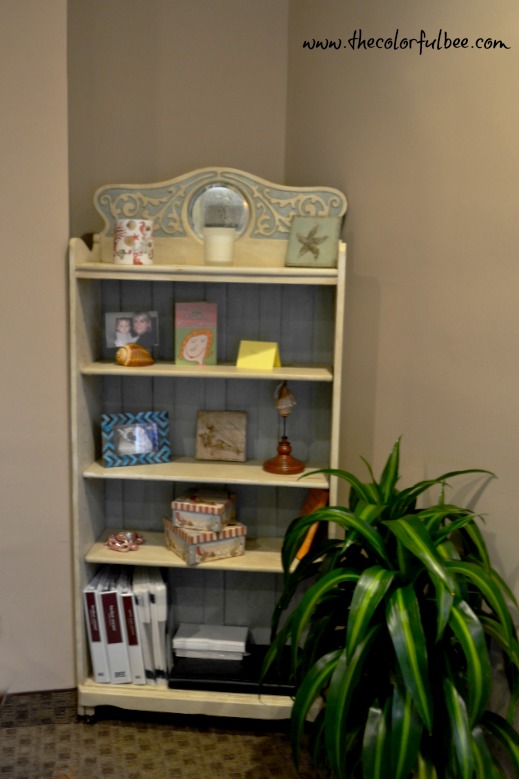
Before: The antique green bookcase and the bombe chest
Both of these pieces had some nice curves and sex appeal – but the colors were ugly. So – I got to work.
The Bombe Chest
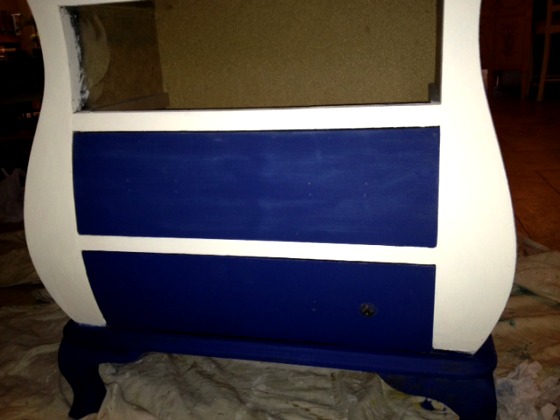
During…
I used some Annie Sloan Chalk Paints to revive this piece – Napoleonic Blue and Old White. Dianne loves anything nautical, so these colors really hit the mark. But I had to add some beachy elements to bring in Dianne’s love of shells and the beach. So – I added this…

On my porch, ready to go to her office!
I added this shell and roses design to the middle drawer. It’s a design called Shell Eloquence from Royal Design Studio – but I did something a little different than just stenciling. I first stenciled the design in Old White…then I freehanded the rest of the motifs – adding some Dutch Metal Gold and some dark brown for shading. I also touched up the hardware with some Dutch Metal Gold. Here’s a closeup of the drawer…
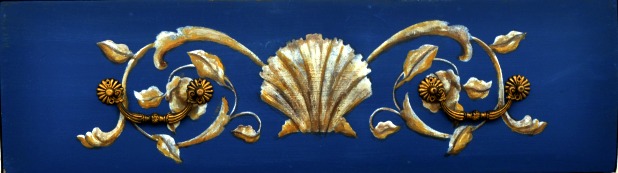
Closeup of the middle drawer design
I waxed the entire piece with Miss Mustardseed’s wax to make it durable. Here’s the chest in Dianne’s new office…
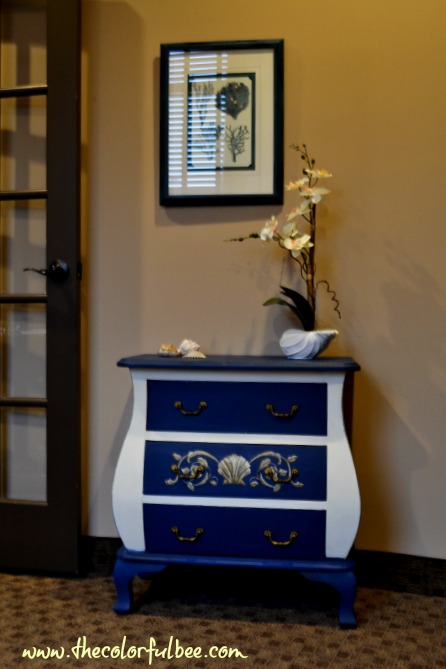
Additional elements added were a lovely blue coral picture that I found at HomeGoods (for $10), but it had a black frame, which I changed by adding some Annie Sloan Chalk Paint and some shells – including a shell planter with a faux orchid.
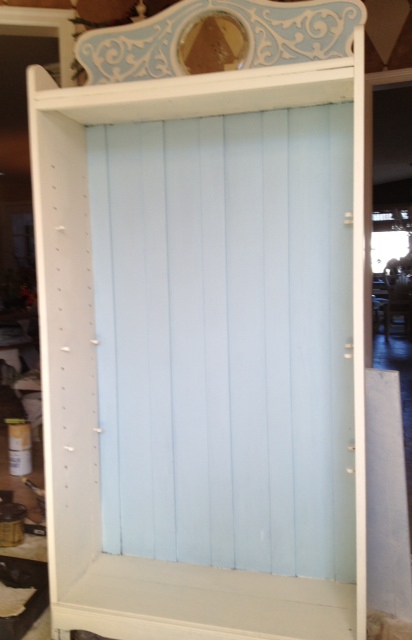
The Bookcase
Being that it was a deep forest green, you really couldn’t see the lovely scroll work at the top of the piece, so I had to make sure that this was prominent. You also didn’t really notice the wonderful paneled backing of this bookcase. I don’t know what year it’s from but the panels had a lot of depth being that every other panel protruded a bit (a staggered bead board effect). I wanted the inset top and the back of the piece to stand out – so I created a custom pale blue paint color for it. The rest of the bookcase was painted an Off White.
During – right before antiquing
I antiqued the bookcase with some raw umber and dark brown glaze, just to bring back the history of the piece.
 Much more feminine…don’t you think? So – please come back tomorrow when I show you how we transformed the windows!!!
Let me know what you think in the comment box below!
Linking this project to: Miss Mustardseed; French Country Cottage; Redoux Interiors; Liz Marie; Common Ground; Between Naps on the Porch; It’s So Very; Katherine’s Corner
Thanks for stopping by The Colorful Bee! Stay in touch and never miss a post.
*Subscribe to receive an e-mail when a new post is up, HERE.
*Subscribe to receive an e-mail when a new post is up, HERE.
8 Comments
Posted in Annie Sloan's chalk paint, interior design, Paint
How to Create an Heirloom: Easy Way to Add Years to New Furniture
Sometimes you buy a piece of furniture that you love but when you get it home it just doesn’t seem to “go” with your home. This happens to me every now and again – unless I’m buying an antique. I find that by giving it a little bit of antiquing helps quite a bit.

Before: Our Swedish clock before I antiqued it
I purchased a lovely Swedish clock that was reasonably priced – especially when I compared it to the real deal antiques that I’ve seen online. The all white clock just looked out of place in my traditional home. So – I got to work, giving it a bit of aging.
- First, I used a clear coat (Aquaseal from Faux Effects) on the entire piece. This seals the surface very well and ensures a better glaze. I let that dry.
- Then I added some adhesive size to some of the the edges of the clock – wherever I wanted to see some gold leafing that was fading. I let it come to tack (about a half hour or so) and then I ripped up some Dutch Metal Gold Leaf and put it on haphazardly wherever I put the size. Let dry.
- Next I mixed up some browns and golds into my glaze mixture (I used Faux Creme clear from Faux Effects) and set about antiquing the piece.
- Finally, after everything was dry, I mixed up some brown and dark brown colorant and dipped a chipbrush into it (and offloaded onto a paper towel) – and then I drybrushed here and there and on the edges to give it more age.
I loved the simplicity of it – just a gentle aging. But as I lived with it what annoyed me was the fact that the clockface still looked new! So I got to work aging the clockface. I just used some glaze that I had leftover from another project that was similar to the glaze I used for the body of the clock – putting it on with a chipbrush and then smoothing it with a badger brush (but you can use any soft bristled brush that you have on hand).

During the clock face aging

Closeup of our clock
Now the clock looks like it belongs in my home. Everything in my home shows it’s age – including me, sorry to say! I may try to find an an antique clockface to really make it look like an heirloom. And I may do some handpainting on it to give it a little more character.
 I hope you enjoyed looking at my project! If you’d like to know more about the Venetian Plaster wall finish in the entryway, click here.
Sharing this with: Funky Junk Interiors; Between Naps on the Porch; Be Colorful; Home Stories from A to Z; BoogieBoard Cottage; Miss Mustardseed; French Country Cottage; Cherished Bliss
Thanks for stopping by The Colorful Bee! Stay in touch and never miss a post.
*Subscribe to receive an e-mail when a new post is up, HERE.
*Subscribe to receive an e-mail when a new post is up, HERE.
22 Comments
Posted in Uncategorized
 Decorative Finishes
 Interior Design
 Home
Home Garden
 Holiday
 Makeovers
 My Life
 Business
 Tutorials
 Videos
 Paint
Paint