From time to time on the blog I will be highlighting some artisans around the globe whose work I love and admire. Today I am featuring Jo Lee from Swedish Interior Design in the UK, who will be showing us how he revamped, painted and antiqued a beautiful, old Swedish Mora clock (one of my favorite pieces of furniture).
About Jo Lee: He is the owner of Swedish Interior Design – Europe’s leading destination for antique Swedish Gustavian, Biedermeier and Art deco furniture and the leader in antique Mora clocks with over 60 of these clocks currently in stock.
Here’s the post…
REPAINTING A MORA CLOCK
While repainting is a fine art in the hands of top professionals, it’s also not rocket science – you just need a bit of thought, good quality materials, a good eye, an understanding of the look you want to achieve and how a piece will naturally age.
At Swedish Interior Design, we have over 60 antique Mora clocks in stock – the largest selection in Europe – so we are used to repainting pieces to enhance their natural beauty where the original paint is badly damaged or it has already been repainted (as many Mora clocks were around the early 1900s).
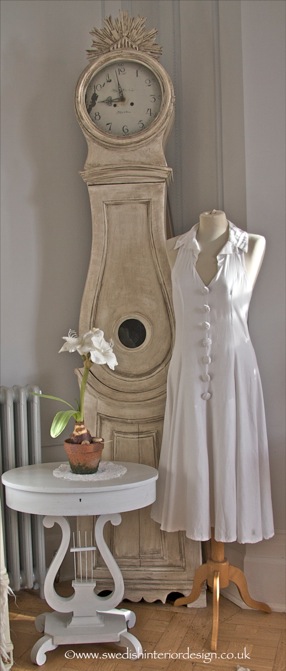
I thought I’d run through a checklist that might help you prepare for your own painting efforts using the work we did on my own personal Mora clock. This amazing 250cm (8 feet and 2 1/2 inches) tall Mora clock was one of the first pieces I found in Sweden, when we started Swedish Interior Design over 8 years ago.
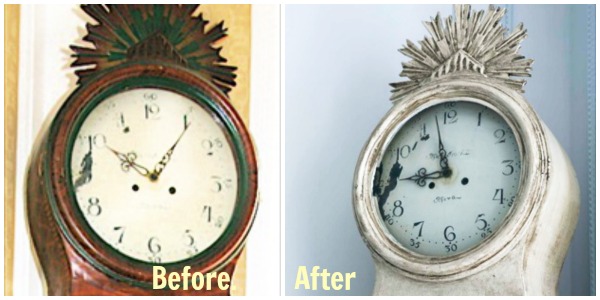
It took my breath away. It was statuesque, superbly proportioned, elegant and painted in reproduction Kurbits Folk Art style. The repaint was probably done in the early 1900s and the colours they had used and the painting style were rather garish. The original Kurbits Folk Art Style was prominent in Sweden in the early part of the 1800s and was a freehand style using feather shapes, swirls and subtle earth tome colors (reds, ochres, yellows, oranges) to create a visually sumptuous but definitely country style.
You can see examples of the kurbits painting from the early 1800s by looking at the 360 degree view of the Swedish Interior Design Kitchen where we have freestanding cabinets from 1799, 1803 and so on with the original Kurbits paint.
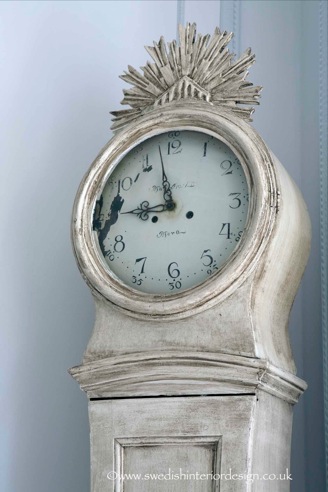
So anyway I digress. I loved the clock but wanted it to fit into our 1886 apartment that was filled with Swedish whites and greys. Having decided on my approximate colour palette of off white with a touch of grey, I looked at the clock and realised that by subtle antiquing I could really embellish the amazing detail in the sun burst crown that ornamented the hood.
Here are the steps I followed:
Step 1 – Key the entire clock with medium sandpaper (180 grit) to allow the paint to grip and look it over to decide whether there were any bits that needed gluing or fixing. Generally I prefer to leave pieces ‘as is’ if possible rather than fix them up to much as the life they have undergone is part of their character and makes them real.
Step 2 – Prepare the tools! In this case a variety of brushes of different sizes to allow me to get a fine coat on to the clock without filling up the wonderful crenulations and shapes on the body with excess paint. You can get very carried away with special brushes but actually we generally use pretty standard ones – my brush heads don’t have to include virgin yak tails from Mongolia!
In this case I used a Craig and Rose acrylic paint (I used Regency White in the Chalky Emulsion finish), which dries nice and quick and that goes on very smoothly with a nice chalky texture. I didn’t use a primer in this case but you can if you want. Alternatively, any chalk-like paint such as Farrow and Ball’s Estate Emulsion, Chalk or Milk Paint could be used. With Chalk and Milk Paint, you would have to wax the piece and not glaze it as I did, which I will talk about a bit later.
Step 3 – Base coat. A nice smooth stroke with a larger headed brush to keep an even spread and smaller headed brushes or ones where I’ve cut them to an angle for getting in and under things!
Always be careful not to let the paint pool or drip and consider it from several angles to make sure the coverage is good. Once I’d built up the base coat, I added 2 further coats at a slightly watered down consistency until I liked the visual texture.
Step 4 – Sand. Light sand to matt the paint down a bit with 320 sandpaper and then some judicious distressing either in the right places where you would naturally get a lot of use (like the handle in the pendulum door) or for effect (to highlight a special feature). I also use a razor blade too sometimes for a different look.
Step 5 – Antiquing. Now that I like the basic colour and the level of distress, I decide how and if I should antique it. When well done, antiquing really adds to the feel of a piece and can highlight its decorative mouldings, giving them a 3D effect. But if overdone or clumsily applied..awful!
Many people like to use wax but I prefer to make up my own antiquing fluid using an acrylic glaze as a base. I mix the acrylic glaze with a dark brown, grey, red or yellow paint so I can create an antiquing colour that matches the colour tones I want to effect and it still looks like the real ‘dirt of ages’. So sometimes it’s greyer, browner, more yellow, ochre or red – whatever you need for a special job.
The key is “think” where naturally dirt would accumulate and build it up in layers and once that’s done to see if you want to use it as a special effect to highlight any feature.
Step 6 – The Finish. Another light dusting with 320 sandpaper in places and then stand back and admire the handiwork.
Overall it probably took a week to do allowing for drying times and eye fatigue – always walk away and come back a while later for a fresh view. It’s amazing what you can miss or the ideas you get by giving your brain and eyes some space.
So here’s my baby now resplendent in my living room.
If you have any questions or want some help, please feel free to ask in the comments below. Also, look us up at Swedish Interior Design blog for tips, tricks, beautiful interiors and antique Swedish furniture. Please follow us on Facebook and GooglePlus.
Hope you enjoyed this visit and tutorial from Jo. Make sure you visit the website because the images there are so beautiful – you will want to make a trip! Thanks Jo!
Related Posts:
Handpainting and Antiquing a Mini Swedish Mora Clock,
How To Paint and Age a New Mora Clock
Sharing this with…Between Naps on the Porch, Be Colorful, Redoux


 Decorative Finishes
 Interior Design
 Home
Home Garden
 Holiday
 Makeovers
 My Life
 Business
 Tutorials
 Videos
 Paint
Paint
First, I just realized that you bear an uncanny resemblance to a dear old friend also named Linda! Second, this is a wonderful article. I am going to check out their site. Thank you so much for sharing this.
hey scribbler
hope you enjoy the site and our Swedish Interior Design Blog – email us if there’s anything you want
This post came just in time. I have an old grandfather clock that I am thinking about painting. After seeing the masterpiece created with the Swedish Mora clock I’m convinced about painting it!
Hi Yvonne – glad to hear that! Yes, I gave up an old grandfather clock that I should have saved many years ago. Stupid me! But I am so happy that you are able to take advantage of this! Shoot me before and afters – will post them!
Thanks,
Linda
thats great – glad we could help.
Hi!!! Glad to see you again – how is everything? Your blog up and running or no? Keep me posted.
Thanks for commenting. Yes – their site is fabulous. They do beautiful work. I wish I had a few Swedish pieces here to make over. That stuff stateside is just way too expensive. I’ll have to just be content with reproductions!
Thanks again…speak soon. Say hi to your friend Linda who looks like me!
Linda
Such a beautiful clock! I love the old Mora clocks and have never seen one like this. I’ve never seen 60 Mora clocks in one place…what a great selection SID has!
Susan (Between Naps on the Porch) recently posted..Zeon Zoysia for the Front Yard
Thanks Susan – I will be sure to tell Jo! The company has so many beautiful Mora clocks, right? He does an amazing job with the finishes!
Linda
Thanx for the kind words – we have spent alot of time sourcing good quality original antique mora clocksin Sweden. There just arent that many left now. So im glad we have lots!
What an absolutely gorgeous makeover! I truly had to keep looking at the before, true work of art. Thank you for sharing at redouxinteriors!
karen recently posted..Le Little Layered Table in Le Grey
Fantastic! You have done one of the best antiquing jobs here that I’ve ever seen. My stomach turns at the sight of a lot of the “handpainted” items around here that people have clumsily antiqued. I recently (off-white) milk-painted and waxed my Mora-esque clock – but did not age it b/c I was afraid it would look terrible – now I think I might have to try it anyway, seeing how pretty yours turned out.