
When I finally convinced my husband that we needed a kitchen renovation, I figured that if I got him that far…let me see if I can also get another room added on – a great room, off the kitchen. Amazingly he said “yes!” This was a few years ago – and I have been working on this great room since then. It’s been a work in progress.Since my laptop is in the repair shop (my hard drive was damaged…so I won’t have access to a lot of my pictures til next week or so), I’d like to share the pictures I do have to show you the work I did on the room.
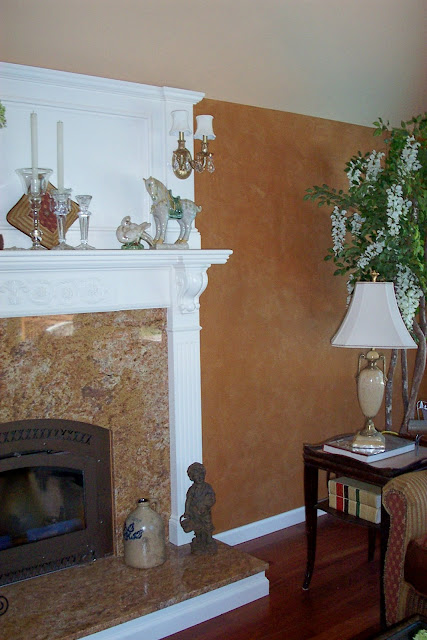


First Incarnation…
I was happy to finally have a fireplace and mantle in my home – yippee, something else to decorate! (And that tree was supposed to be on our deck then – sorry about that one). But having the mantle so stark white really wasn’t doing it for me. I had done a nice sueded plaster on the walls in a cinnamon hue – very Ralph Lauren-ish kind of look and feel (without it being Ralph Lauren material!)…and I loved the warmth of it.
So – what’s a girl to do to make it all come together? Add some decorative onlays, gold leaf them and then antique the entire mantle.

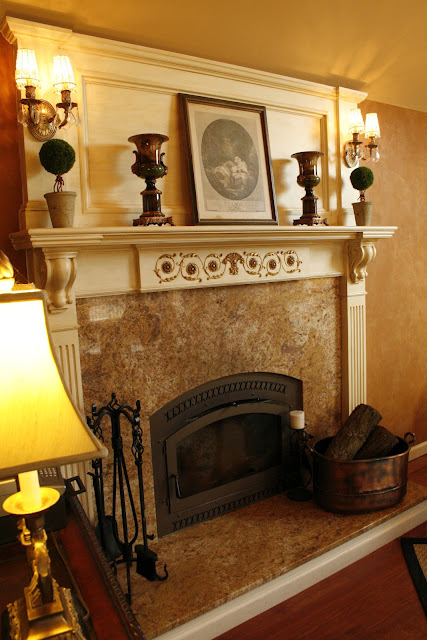
Mantle…After
The gold leafing (or gilding) of the onlay gave the mantle more distinction and character, I think. And the antiquing gave the onlay a nice patina – and now the tone of the painted wood blends so much better with the finish on the wall. Before the white just shouted at me – I am so much happier with this look.

Closeup of gilded and antiqued onlay
GILDING STEP-BY-STEP…
-
I first painted the onlay with a yellow gold paint – this will help you out later…because not every piece of leaf will stick!
-
I used Gold Leaf sheets from Michael’s – nothing fancy. But after you put on the gold leaf size (the glue that makes the leaf stick to what you are gilding which you can get at Michael’s also) – let it come to a tack. Don’t put the gold leaf on when the size is still wet. Never place your finger on the size to check if it’s ready – use your index finger knuckle to check it.
-
Once it’s ready, place the sheets on your object and tamp them down softly with a soft artist’s brush. Once everything is on your onlay (or whatever you are gilding), take some cheesecloth and start to take and brush away the gold leafing that didn’t stick. You can use an artist’s brush to get into any crevices etc.
-
Once that’s done, use your cheesecloth to burnish the gold leaf – you’ll begin to see that it starts to get shinier. Now – the leaf sold at Michael’s and elsewhere is not real gold leaf…so the leaf will look a bit too brassy. But after you antique it (as I did – with the rest of the mantle), it will lessen the shininess. In addition, I took an artist’s brush and took some dark brown tint and brushed it on to age and darken it.
-
Optional: You can also use a dark wax (Annie Sloan’s Dark Wax or Liberon Wax etc) to do this as well. This will protect and seal your work
So – hope you enjoyed this. If you’d like to see a few more pics of this up close…click the links below to my website.
Happy Painting!!
Linking this project up to…
Miss Mustardseed Romantic Home Serenity Now French Country Cottage Funky Junk Interiors Home Stories A to Z My Uncommon Slice of Suburbia


 Decorative Finishes
 Interior Design
 Home
Home Garden
 Holiday
 Makeovers
 My Life
 Business
 Tutorials
 Videos
 Paint
Paint
Looks stunning!!! Don't you just love it when we get our hubbies to say YES:)
Blessings,
Linda
Very nice! I sooo wish I had a mantle!
The painted mantel adds such a wonderful richness to the whole room!
dee dee
That is just so gorgeous! You made it look like a work of art and we are so glad you shared this with us at Inspiration Friday!
Vanessa
The difference on that mantle is like night and day. Beautiful job! ~ Maureen
Hi Linda,
Your mantel is gorgeous! I love the gold leaf. I used gold leaf on my chandelier.
Dee
Hi Dee! Did you blog about that? Would love to see your chandelier.
Thanks everyone for all your comments!
Its really beautiful & stunning pic's. So good to see such a fine design & art form.
Love the way you made the details pop – really pretty!
Antiquing the mantel was a great idea – the softer white works much better with the warm colour on the wall. And the gold gilding on the onlay really brings it to life and makes it a real feature on the mantel. Nice job!
Kelly
Simply want to say your article is as amazing. The clarity in your put up is just nice and i could think you are knowledgeable on this subject. Fine with your permission allow me to take hold of your feed to keep updated with approaching post. Thank you 1,000,000 and please continue the enjoyable work.
Thank you! I went to your website as well today. Beautiful precast mantles! I love them!